
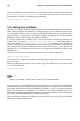
Installation guide


150 Chapter 15. BIND Configuration
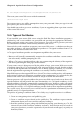
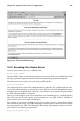
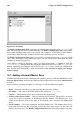
Figure 15-1. bindconf
The BIND Configuration Tool configures the default zone directory to be /var/named. All
zone files specified are relative to this directory. The BIND Configuration Tool also includes
basic syntax checking when values are entered. For example, if a valid entry is an IP address,
you are only allowed to type numbers and the dot (.) character into the text area.
The BIND Configuration Tool allows you to add a forward master zone, a reverse master
zone, and a slave zone. After adding the zones, you can edit or delete them from the main
window as shown in Figure 15-1.
After adding, editing, or deleting a zone, you must choose File => Apply to write the
/etc/named.conf configuration file and all the individual zone files in the /var/named di-
rectory. Applying your changes will also have the named service reload the configuration
files. You can also choose File => Exit and click Yes to Do you want to apply your changes
before exiting?
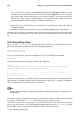
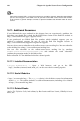
15.1. Adding a Forward Master Zone
To add a forward master zone (also known as a primary master), click the Add button, select
Forward Master Zone, and enter the domain name for the master zone in the Domain name
text area.
A new window as shown in Figure 15-2 will appear with the following options:
• Name — Domain name that was just entered in the previous window.
• File Name — File name of the DNS database file, relative to /var/named.
• Contact — Email address of the main contact for the master zone.
• Primary Name Server (SOA) — State of authority (SOA) record. This specifies the name
server that is the best resource of information for this domain. The default value is @,
which means that the SOA is the same as the domain name entered in the Name field
above.
• Serial Number — The serial number of the DNS database file. This number must be in-
cremented each time the file is changed, so that the slave name servers for the zone will
retrieve the latest data. The BIND Configuration Tool increments this number each time