
Installation guide


Chapter 9. OpenSSH 101
Accept the default file location (~/.ssh/identity). Enter a passphrase different from
your account password. Confirm the passphrase by entering it again.
The public key is written to ~/.ssh/identity.pub. The private key is written to
~/.ssh/identity. Do not give anyone the private key.
2. Change the permissions of your .ssh directory and your key with the commands
chmod 755 ~/.ssh and chmod 644 ~/.ssh/identity.pub.
3. Copy the contents of ~/.ssh/identity.pub to the file ~/.ssh/authorized_keys on
the machine to which you wish to connect. If the file ~/.ssh/authorized_keys
does not exist, you can copy the file ~/.ssh/identity.pub to the file
~/.ssh/authorized_keys on the remote machine.
1
4. If you are running GNOME, skip to Section 9.3.4.4. If you are not running GNOME,
skip to Section 9.3.4.5.
9.3.4.4. Configuring ssh-agent with GNOME
The ssh-agent utility can be used to save your passphrase so that you do not have to enter
it each time you initiate an ssh or scp connection. If you are using GNOME, the openssh-
askpass-gnome utility can be used to prompt you for your passphrase when you log in to
GNOME and save it until you log out of GNOME. You will not have to enter your password
or passphrase for any ssh or scp connection made during that GNOME session. If you are
not using GNOME, refer to Section 9.3.4.5.
To save your passphrase during your GNOME session, follow the following steps:
1. You’ll need to have the package openssh-askpass-gnome installed; you can use the
command rpm -q openssh-askpass-gnome to determine if it is installed or not. If it
is not installed, install it from your Red Hat CD-ROM set, from a Red Hat FTP mirror
site, or using Red Hat Network.
2. If you do not have an ~/.Xclients file, you can run switchdesk to create it. In your
~/.Xclients file, edit the following line:
exec $HOME/.Xclients-default
Change the line so that it instead reads:
exec /usr/bin/ssh-agent $HOME/.Xclients-default
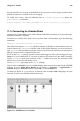
3. Open the GNOME Control Center (GNOME Main Menu Button => Programs => Set-
tings => GNOME Control Center) and go to Session => Startup Programs. Click Add
and enter /usr/bin/ssh-add in the Startup Command text area. Set it a priority to
a number higher than any existing commands to ensure that it is executed last. A good
priority number for ssh-add is 70 or higher. The higher the priority number, the lower
the priority. If you have other programs listed, this one should have the lowest priority.
Click OK to save your settings, and exit the GNOME Control Center.
4. Log out and then log back into GNOME; in other words, restart X. After GNOME
is started, a dialog box will appear prompting you for your passphrase(s). Enter the
passphrase requested. If you have both DSA and RSA key pairs configured, you will
1. The ~ stands for the home directory of the currently logged in user. See the Official Red Hat Linux
Getting Started Guide for more details.