
Installation guide

How to Configure a SiteMinder Web Agent on IIS 7.0
86 Web Agent Installation Guide
a. Select a servlet engine to be configured for the web server. If you do not
see your engine displayed, select Other Advanced server. Click Next.
b. In the Self Registration Services Admin Account dialog box, identify the
the DMS Administrator by provide values for the Admin User Name,
Admin Password and Admin Confirm Password fields and click Next.
The user name and password that you enter here must match the DMS
Admin values you set at the Policy Server.
The DMS Administrator account secures DMS requests that are
performed outside of the scope of a DMS administrator, such as
self-registration. The user name and encrypted password for the account
are stored in the dms.properties file on the Web Agent.
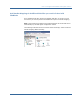
6. In the Web Server Configuration Summary dialog box, confirm that the
configuration settings are correct, then click Install.
The Web Agent files are installed.
7. Click Done when the installation is complete.
8. Enable the Web Agent:
a. Open the WebAgent.conf file located in web_agent_home\bin\IIS
Example: C:\Program Files\CA\webagent\bin\IIS
b. Set the value of the EnableWebAgent parameter to yes.
c. Save the file and restart the web server.
Note: You need to reboot the machine once the Agent is configured to
ensure proper logging of Agent and trace messages.
More Information
Install a Web Agent on a Windows System (see page 31)