
User`s guide


Installing iPlanet Web Server for Windows NT
38 Installation and Migration Guide
Typical and Custom installation give you more options, and for this release
do the same thing.
Warning If you are upgrading from iPlanet Web Server 4.0, use Typical or Custom
installation, not Express installation.
If you chose Express installation, the following settings are set automatically
for you. If you want to have different values for these settings, choose
Typical or Custom installation.
Warning Do not use Express Installation if you already have another web server
running on port 80.
Click Next.
5. The Location of Installation dialog box appears. The default location for the
server files is
C:
\Netscape\Server4, where C: is the letter of the drive
on which you are installing the server. Click Next.
If you want to install iPlanet Web Server in a non-default location, use
Browse to navigate to the folder you want.
Warning If you have iPlanet Web Server 4.0 installed already, and you want to
upgrade it to iPlanet Web Server 4.1, you must install 4.1 in the directory
where 4.0 is installed. Your 4.0 server is automatically upgraded to 4.1.
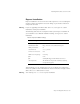
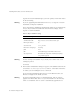
Table 2.2 Express installation settings
Installation Setting Vales
administration port 8888
administration URL http://machine name:adminisration port
HTTP port number 80
document root server_root/doc
LDAP users and groups not using
JDK none
JRE default JRE shipped with iPlanet Web Server
subcomponents All default subcomponents installed (everything
except WAI support)