
Installation guide


A progress page shows the progress of those actions for each added node.
5. When the process of adding a node is complete, a page is displayed providing a
configuration interface for the cluster.
6. At the detailed menu for the cluster (below the clu st ers menu), click N o d es. Clicking No d es
causes the following displays:
A list of cluster nodes in the center of the page
The Ad d a No d e element and the Co n f ig u re element with a list of the nodes configured
in the cluster at the detailed menu for the cluster (below the clu st ers menu)
7. Click the link for an added node at either the list in the center of the page or in the list in the
detailed menu under the clu st ers menu. Clicking the link for the added node causes a page
to be displayed for that link showing how that node is configured.
8. At the bottom of the page, under Main Fen cin g Met h o d , click Add a fence device to
this level.
9. Select a fence device and provide parameters for the fence device (for example port number).
Note
You can choose from an existing fence device or create a new fence device.
10. Click Update main fence properties and wait for the change to take effect.
3.6.3. Delet ing a Member from a Clust er
To delete a member from an existing cluster that is currently in operation, follow the steps in this
section. The starting point of the procedure is at the Choose a cluster to administer page
(displayed on the clu st er tab).
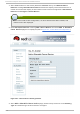
1. Click the link of the node to be deleted. Clicking the link of the node to be deleted causes a
page to be displayed for that link showing how that node is configured.
Note
To allow services running on a node to fail over when the node is deleted, skip the next
step.
2. Disable or relocate each service that is running on the node to be deleted:
Note
Repeat this step for each service that needs to be disabled or started on another node.
a. Under Services o n t h is No d e, click the link for a service. Clicking that link cause a
configuration page for that service to be displayed.
Chapt er 3. Configuring Red Hat Clust er Wit h Conga
4 3