
Installation guide


Creating a cluster consists of selecting a set of nodes (or members) to be part of the cluster. Once
you have completed the initial step of creating a cluster and creating fence devices, you need to
configure cluster nodes. To initially configure cluster nodes after creating a new cluster, follow the
steps in this section. The starting point of the procedure is at the cluster-specific page that you
navigate to from Choose a cluster to administer displayed on the clu st er tab.
1. At the detailed menu for the cluster (below the clu st ers menu), click No d es. Clicking No d es
causes the display of an Add a No d e element and a C o n f ig u re element with a list of the
nodes already configured in the cluster.
2. Click a link for a node at either the list in the center of the page or in the list in the detailed
menu under the clu st ers menu. Clicking a link for a node causes a page to be displayed for
that link showing how that node is configured.
3. At the bottom of the page, under Main Fen cin g Met h o d , click Add a fence device to
this level.
4. Select a fence device and provide parameters for the fence device (for example port number).
Note
You can choose from an existing fence device or create a new fence device.
5. Click Update main fence properties and wait for the change to take effect.
3.6.2. Adding a Member t o a Running Clust er
To add a member to a running cluster, follow the steps in this section. The starting point of the
procedure is at the cluster-specific page that you navigate to from Choose a cluster to
administer displayed on the clu st er tab.
1. At the detailed menu for the cluster (below the clu st ers menu), click No d es. Clicking No d es
causes the display of an Add a No d e element and a C o n f ig u re element with a list of the
nodes already configured in the cluster. (In addition, a list of the cluster nodes is displayed in
the center of the page.)
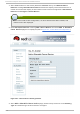
2. Click Ad d a N o d e. Clicking Ad d a N o d e causes the display of the Add a node to
cluster name page.
3. At that page, enter the node name in the No d e H o st n ame text box; enter the root password
in the Ro o t Passwo rd text box. Check the En ab le Sh ared St o rag e Su p p o rt checkbox if
clustered storage is required. If you want to add more nodes, click Add another entry and
enter node name and password for the each additional node.
4. Click Submit. Clicking Submit causes the following actions:
a. Cluster software packages to be downloaded onto the added node.
b. Cluster software to be installed (or verification that the appropriate software packages
are installed) onto the added node.
c. Cluster configuration file to be updated and propagated to each node in the cluster —
including the added node.
d. Joining the added node to cluster.
Red Hat Ent erprise Linux 5 Clust er Administ rat ion
4 2