SecurityCenter 4.
Table of Contents Introduction ......................................................................................................................................... 3 Standards and Conventions ....................................................................................................................... 3 Resource Requirements ..................................................................................................................... 4 Recommended Minimum Hardware Requirements .......
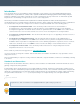
Introduction This document discusses the installation, initial configuration, and a sample scan using Tenable Network Security’s SecurityCenter 4.7 (US Patent No. 7,926,113 B1, “System and Method for Managing Network Vulnerability Analysis Systems”). Hardware and software requirements as well as detailed step-by-step instructions are included along with important notes and warnings to help ensure the success of the deployment.
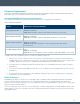
Resource Requirements This section describes SecurityCenter’s minimum requirements for hardware, network, and disk storage. Note that the particular needs of your organization must be factored into this guideline. Recommended Minimum Hardware Requirements The following chart outlines the minimum hardware requirements for operating the SecurityCenter.
Disk Space Adequate disk space is critical to a successful SecurityCenter deployment. An important consideration is that SecurityCenter saves a snapshot of the entire vulnerability archive each day. In addition, the size of the vulnerability data stored by SecurityCenter depends on the number and types of vulnerabilities, not just the number of hosts. For example, 100 hosts with 100 vulnerabilities each could consume as much data as 1,000 hosts with 10 vulnerabilities each.
The operating system must be configured in a secure manner to ensure that security controls cannot be bypassed. The network must be configured to ensure that the SecurityCenter system resides in a secure network segment that is not accessible from the Internet. Network time synchronization must be enabled to ensure that accurate time stamps are recorded in reports and log files. The time zone is set automatically during the installation process with no user interaction.
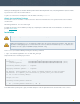
java-1.6.0-openjdk.i386 (or the latest Oracle Java JRE) openssh expat gdbm libtool libtool-ltdl libxml2 ncurses readline compat-libstdc++ libxslt Using the latest stable production version of each package is recommended. For a list of required packages, run the following command against the SecurityCenter RPM file: # rpm –qpR SecurityCenter-4.x.x-es6.x86_64.
Audit Log /opt/sc4/admin/logs/ Organization Logs /opt/sc4/orgs//logs/ Communication Interfaces User Access: HTTPS Plugin Updates: Acquired over SSL from Tenable servers directly to SecurityCenter or for offline installation. Plugin packages are secured via 4096-bit RSA digital signatures. Tenable Applications If you are running Tenable’s Log Correlation Engine (LCE), please note that LCE 4.2 or higher is required for complete functionality with SecurityCenter 4.6.
SecurityCenter generates a warning in the web interface if the license limit has been exceeded or is approaching capacity. Contact Tenable Sales for a temporary or permanent expanded license key. You will need to provide the hostname of the machine on which SecurityCenter will be installed. This can be obtained by entering the “hostname” command at the shell prompt. SecurityCenter does not support an unlicensed “demo” mode – a temporary or permanent key is required.
During an install/upgrade, the installer will drop a file named “SecurityCenter4” into /etc/logrotate.d/ that contains log rotate rules for the files mentioned above. Log files are rotated on a monthly basis. This file will be owned by root/root. Obtain the Installation Package The installer comes in a number of versions based on OS level and architecture. The general format of the installer is shown below: SecurityCenter-x.x.x-os.arch.
In some rare cases, a system restart will be required after the installation of SecurityCenter for all services to be properly started. Initial Configuration SecurityCenter Web Interface Adobe Flash Player must be installed to use the SecurityCenter 4 web interface. It can be obtained at http://get.adobe.com/flashplayer/. Navigation To navigate within the SecurityCenter user interface, use the menus on the web interface screen, not the browser’s back and forward arrow buttons.
License Upload This will present a license upload screen: Disable any pop-up blockers for this page, as they will prevent the license key upload interface from working correctly. In this step, the user is prompted to upload the license file that was received by email from Tenable. The format of the key file name is: _SC-<#>-<#>.key Click “Upload License” and use the browse dialog to upload your license key file.
License and Activation Code Input Page Once a valid license has been uploaded and “Next” has been clicked, a user cannot return to this page. Other configuration steps after this one do contain “Back” buttons. A plugin download is initiated in the background. This plugin download can take several minutes and must complete before any Nessus scans are initiated. Once the plugin update has occurred, the “Last Updated” date and time are updated on the “Plugins” screen.
Email Configuration Email configuration enables the system to send alerts, reports, and notifications and perform other email-based functions. Email Server Configuration Page After entering the required fields for your SMTP server, click “Test SMTP Settings” to confirm that the email settings are correct. Make sure no white space is included in the hostname field or this will cause the SMTP test to fail. Click “Next” to continue or “Skip” to skip this step.
LDAP Configuration LDAP Configuration Page LDAP configuration enables users to utilize their external LDAP repository for SecurityCenter logins. Consult with your system administrator for necessary LDAP server settings and once all required fields have been completed, click “Check LDAP Configuration” to confirm. Click “Next” to continue or “Skip” to skip this step. Repository Setup When creating repositories, note that IPv4 and IPv6 addresses must be stored separately.
repositories are useful in multi-SecurityCenter configurations where security installations are separate but reports are shared. “Offline” repositories also contain addressing information from another SecurityCenter. More information about Remote and Offline repositories may be found in the SecurityCenter Administrator guide. However, the information is imported to the new installation via a configuration file and not via a direct network connection.
Organization Head Setup “Organizational users” refers to users without the admin role who perform day-to-day functions such as scanning and reporting. The Organization Head user is the primary user created for the Organization and is the highest-level security manager within SecurityCenter. The Organization Head is also the initial Organizational user to log in and is responsible for creating other Organizational users.
Password Change Dialog After changing the password, you are automatically taken to the admin dashboard. Adding a Nessus Scanner and Test Scan This section will discuss the basic steps for adding a Nessus scanner and then creating and running a test scan. This section assumes that the Nessus software has already been installed and an administrator user has been configured on the Nessus scanner.
Make sure that the Scan Zone “Name” and “Ranges” have been entered before you click “Submit”. The “Description” field is optional, but is a helpful reference to determine the use of the Scan Zone by others in the Organization. The Ranges determine what IP ranges will be allowed to be scanned by the scanner added in the next step.
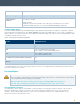
Add a Nessus Scanner To add a Nessus scanner, log in as the admin user and click “Resources” and then “Nessus Scanners”. Click “Add” and a page similar to the screen capture below is displayed: Nessus Scanner Add Dialog Available fields include the scanner Name, Description, Host, Port, Authentication Type, Login, Password, Verify Hostname, Use Proxy, State, and Zones. The “Name” and “Description” fields are descriptive information included to describe the scanner being added.
Before a scan is configured, SecurityCenter must push the latest set of plugins to the Nessus scanner. An “Updating Plugins” message is displayed in the Status column of the GUI. To facilitate this, click “Update Status” at the top of the “Plugins” screen to initiate a manual update of plugins. Nessus plugins are listed as type “Active”, while Passive Vulnerability Scanner (PVS) plugins are listed as “Passive”.
Click “Load Policy Template” and select “Full Safe Scan – Common Ports”. A page similar to the one below is displayed: Modify any of the predefined “Basic” settings within this screen based on your scan target environment. For example, if scanning a router that is sensitive to multiple connections, consider lowering the “Max Checks Per Host” and “Max TCP Connections” to a level less likely to cause issues.
To create our test scan, click “Add” and then fill out the name and description for the scan. Under “Scan Schedule”, choose “Template” and add a single test IP address or hostname under “Targets”. Select a repository where the scan results will be stored and then click “Next”. Under “Policy”, choose the policy created earlier, or alternatively, select a plugin from the “Browse Plugins” dialog. For “Scan Zone” choose “default” and then click “Next”.
About Tenable Network Security Tenable Network Security is relied upon by more than 20,000 organizations, including the entire U.S. Department of Defense and many of the world’s largest companies and governments, to stay ahead of emerging vulnerabilities, threats and compliance-related risks. Its Nessus and SecurityCenter solutions continue to set the standard to identify vulnerabilities, prevent attacks and comply with a multitude of regulatory requirements. For more information, please visit www.tenable.