
System information

If neither the -u or -g options are specified, only the user quota file is created. If only -g is specified,
only the group quota file is created.
After the files are created, run the following command to generate the table of current disk usage per
file system with quotas enabled:
# q uo tacheck -avug
The options used are as follows:
a
Check all quota-enabled, locally-mounted file systems
v
Display verbose status information as the quota check proceeds
u
Check user disk quota information
g
Check group disk quota information
After q uo tacheck has finished running, the quota files corresponding to the enabled quotas (user
and/or group) are populated with data for each quota-enabled locally-mounted file system such as
/ho me.
16.1.4 . Assigning Quot as per User
The last step is assigning the disk quotas with the ed q uo ta command.
To configure the quota for a user, as root in a shell prompt, execute the command:
# ed q uo ta username
Perform this step for each user who needs a quota. For example, if a quota is enabled in
/etc/fstab for the /ho me partition (/d ev/Vo l G ro up0 0 /Lo g Vo l 0 2 in the example below) and
the command ed q uo ta testuser is executed, the following is shown in the editor configured as the
default for the system:
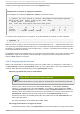
Disk quotas for user testuser (uid 501):
Filesystem blocks soft hard inodes soft
hard
/dev/VolGroup00/LogVol02 440436 0 0 37418 0
0
Note
The text editor defined by the ED IT OR environment variable is used by ed q uo ta. To change
the editor, set the ED IT O R environment variable in your ~ /. bash_pro fi l e file to the full
path of the editor of your choice.
Chapt er 1 6 . Disk Q uot as
121