
Installation guide
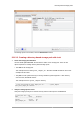


Chapter 26. Storage pools
216
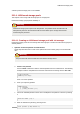
3. Create the local directory
Use the virsh pool-build command to build the directory-based storage pool. virsh pool-
build sets the required permissions and SELinux settings for the directory and creates the
directory if it does not exist.
# virsh pool-build guest_images_dir
Pool guest_images_dir built
# ls -la /guest_images
total 8
drwx------. 2 root root 4096 May 30 02:44 .
dr-xr-xr-x. 26 root root 4096 May 30 02:44 ..
# virsh pool-list --all
Name State Autostart
-----------------------------------------
default active yes
guest_images_dir inactive no
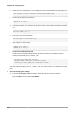
4. Start the storage pool
Use the virsh command pool-start for this. pool-start enables a directory storage pool,
allowing it to be used for volumes and guests.
# virsh pool-start guest_images_dir
Pool guest_images_dir started
# virsh pool-list --all
Name State Autostart
-----------------------------------------
default active yes
guest_images_dir active no
5. Turn on autostart
Turn on autostart for the storage pool. Autostart configures the libvirtd service to start the
storage pool when the service starts.
# virsh pool-autostart guest_images_dir
Pool guest_images_dir marked as autostarted
# virsh pool-list --all
Name State Autostart
-----------------------------------------
default active yes
guest_images_dir active yes
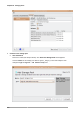
6. Verify the storage pool configuration
Verify the storage pool was created correctly, the sizes reported correctly, and the state reports as
running.
# virsh pool-info guest_images_dir
Name: guest_images_dir
UUID: 779081bf-7a82-107b-2874-a19a9c51d24c
State: running
Capacity: 49.22 GB
Allocation: 12.80 GB
Available: 36.41 GB
# ls -la /guest_images
total 8
drwx------. 2 root root 4096 May 30 02:44 .
dr-xr-xr-x. 26 root root 4096 May 30 02:44 ..
#