
Installation guide
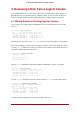
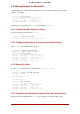

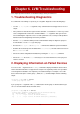

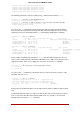
Table Of Contents
- LVM Administrator's Guide
- Table of Contents
- Introduction
- Chapter 1. The LVM Logical Volume Manager
- Chapter 2. LVM Components
- Chapter 3. LVM Administration Overview
- Chapter 4. LVM Administration with CLI Commands
- 1. Using CLI Commands
- 2. Physical Volume Administration
- 3. Volume Group Administration
- 3.1. Creating Volume Groups
- 3.2. Adding Physical Volumes to a Volume Group
- 3.3. Displaying Volume Groups
- 3.4. Scanning Disks for Volume Groups to Build the Cache File
- 3.5. Removing Physical Volumes from a Volume Group
- 3.6. Changing the Parameters of a Volume Group
- 3.7. Activating and Deactivating Volume Groups
- 3.8. Removing Volume Groups
- 3.9. Splitting a Volume Group
- 3.10. Combining Volume Groups
- 3.11. Backing Up Volume Group Metadata
- 3.12. Renaming a Volume Group
- 3.13. Moving a Volume Group to Another System
- 3.14. Recreating a Volume Group Directory
- 4. Logical Volume Administration
- 4.1. Creating Logical Volumes
- 4.2. Persistent Device Numbers
- 4.3. Resizing Logical Volumes
- 4.4. Changing the Parameters of a Logical Volume Group
- 4.5. Renaming Logical Volumes
- 4.6. Removing Logical Volumes
- 4.7. Displaying Logical Volumes
- 4.8. Growing Logical Volumes
- 4.9. Extending a Striped Volume
- 4.10. Shrinking Logical Volumes
- 5. Creating Snapshot Volumes
- 6. Controlling LVM Device Scans with Filters
- 7. Online Data Relocation
- 8. Activating Logical Volumes on Individual Nodes in a Cluster
- 9. Customized Reporting for LVM
- Chapter 5. LVM Configuration Examples
- Chapter 6. LVM Troubleshooting
- Chapter 7. LVM Administration with the LVM GUI
- Appendix A. The Device Mapper
- Appendix B. The LVM Configuration Files
- Appendix C. LVM Object Tags
- Appendix D. LVM Volume Group Metadata
- Index

4.2. Moving Extents to a New Disk
In this example, the logical volume is distributed across three physical volumes in the volume
group myvg as follows:
[root@tng3-1]# pvs -o+pv_used
PV VG Fmt Attr PSize PFree Used
/dev/sda1 myvg lvm2 a- 17.15G 7.15G 10.00G
/dev/sdb1 myvg lvm2 a- 17.15G 15.15G 2.00G
/dev/sdc1 myvg lvm2 a- 17.15G 15.15G 2.00G
We want to move the extents of /dev/sdb1 to a new device, /dev/sdd1.
4.2.1. Creating the New Physical Volume
Create a new physical volume from /dev/sdd1.
[root@tng3-1 ~]# pvcreate /dev/sdd1
Physical volume "/dev/sdd1" successfully created
4.2.2. Adding the New Physical Volume to the Volume Group
Add /dev/sdd1 to the existing volume group myvg.
[root@tng3-1 ~]# vgextend myvg /dev/sdd1
Volume group "myvg" successfully extended
[root@tng3-1]# pvs -o+pv_used
PV VG Fmt Attr PSize PFree Used
/dev/sda1 myvg lvm2 a- 17.15G 7.15G 10.00G
/dev/sdb1 myvg lvm2 a- 17.15G 15.15G 2.00G
/dev/sdc1 myvg lvm2 a- 17.15G 15.15G 2.00G
/dev/sdd1 myvg lvm2 a- 17.15G 17.15G 0
4.2.3. Moving the Data
Use the pvmove command to move the data from /dev/sdb1 to /dev/sdd1.
[root@tng3-1 ~]# pvmove /dev/sdb1 /dev/sdd1
/dev/sdb1: Moved: 10.0%
...
/dev/sdb1: Moved: 79.7%
...
/dev/sdb1: Moved: 100.0%
[root@tng3-1]# pvs -o+pv_used
PV VG Fmt Attr PSize PFree Used
/dev/sda1 myvg lvm2 a- 17.15G 7.15G 10.00G
/dev/sdb1 myvg lvm2 a- 17.15G 17.15G 0
/dev/sdc1 myvg lvm2 a- 17.15G 15.15G 2.00G
/dev/sdd1 myvg lvm2 a- 17.15G 15.15G 2.00G
4.2.4. Removing the Old Physical Volume from the Volume Group
After you have moved the data off /dev/sdb1, you can remove it from the volume group.
4.2. Moving Extents to a New Disk
57