
Installation guide

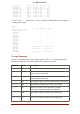
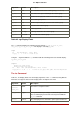
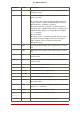

Table Of Contents
- LVM Administrator's Guide
- Table of Contents
- Introduction
- Chapter 1. The LVM Logical Volume Manager
- Chapter 2. LVM Components
- Chapter 3. LVM Administration Overview
- Chapter 4. LVM Administration with CLI Commands
- 1. Using CLI Commands
- 2. Physical Volume Administration
- 3. Volume Group Administration
- 3.1. Creating Volume Groups
- 3.2. Adding Physical Volumes to a Volume Group
- 3.3. Displaying Volume Groups
- 3.4. Scanning Disks for Volume Groups to Build the Cache File
- 3.5. Removing Physical Volumes from a Volume Group
- 3.6. Changing the Parameters of a Volume Group
- 3.7. Activating and Deactivating Volume Groups
- 3.8. Removing Volume Groups
- 3.9. Splitting a Volume Group
- 3.10. Combining Volume Groups
- 3.11. Backing Up Volume Group Metadata
- 3.12. Renaming a Volume Group
- 3.13. Moving a Volume Group to Another System
- 3.14. Recreating a Volume Group Directory
- 4. Logical Volume Administration
- 4.1. Creating Logical Volumes
- 4.2. Persistent Device Numbers
- 4.3. Resizing Logical Volumes
- 4.4. Changing the Parameters of a Logical Volume Group
- 4.5. Renaming Logical Volumes
- 4.6. Removing Logical Volumes
- 4.7. Displaying Logical Volumes
- 4.8. Growing Logical Volumes
- 4.9. Extending a Striped Volume
- 4.10. Shrinking Logical Volumes
- 5. Creating Snapshot Volumes
- 6. Controlling LVM Device Scans with Filters
- 7. Online Data Relocation
- 8. Activating Logical Volumes on Individual Nodes in a Cluster
- 9. Customized Reporting for LVM
- Chapter 5. LVM Configuration Examples
- Chapter 6. LVM Troubleshooting
- Chapter 7. LVM Administration with the LVM GUI
- Appendix A. The Device Mapper
- Appendix B. The LVM Configuration Files
- Appendix C. LVM Object Tags
- Appendix D. LVM Volume Group Metadata
- Index

To display a reverse sort, precede a field you specify after the -O argument with the - character.
# pvs -o pv_name,pv_size,pv_free -O -pv_free
PV PSize PFree
/dev/sdd1 17.14G 17.14G
/dev/sdb1 17.14G 17.14G
/dev/sdc1 17.14G 17.09G
9.4. Specifying Units
To specify the unit for the LVM report display, use the --units argument of the report command.
You can specify (b)ytes, (k)ilobytes, (m)egabytes, (g)igabytes, (t)erabytes, (e)xabytes,
(p)etabytes, and (h)uman-readable. The default display is human-readable. You can override
the default by setting the units parameter in the global section of the lvm.conf file.
The following example specifies the output of the pvs command in megabytes rather than the
default gigabytes.
# pvs --units m
PV VG Fmt Attr PSize PFree
/dev/sda1 lvm2 -- 17555.40M 17555.40M
/dev/sdb1 new_vg lvm2 a- 17552.00M 17552.00M
/dev/sdc1 new_vg lvm2 a- 17552.00M 17500.00M
/dev/sdd1 new_vg lvm2 a- 17552.00M 17552.00M
By default, units are displayed in powers of 2 (multiples of 1024). You can specify that units be
displayed in multiples of 1000 by capitalizing the unit specification (B, K, M, G, T, H).
The following command displays the output as a multiple of 1024, the default behavior.
# pvs
PV VG Fmt Attr PSize PFree
/dev/sdb1 new_vg lvm2 a- 17.14G 17.14G
/dev/sdc1 new_vg lvm2 a- 17.14G 17.09G
/dev/sdd1 new_vg lvm2 a- 17.14G 17.14G
The following command displays the output as a multiple of 1000.
# pvs --units G
PV VG Fmt Attr PSize PFree
/dev/sdb1 new_vg lvm2 a- 18.40G 18.40G
/dev/sdc1 new_vg lvm2 a- 18.40G 18.35G
/dev/sdd1 new_vg lvm2 a- 18.40G 18.40G
You can also specify (s)ectors (defined as 512 bytes) or custom units.
The following example displays the output of the pvs command as a number of sectors.
# pvs --units s
PV VG Fmt Attr PSize PFree
/dev/sdb1 new_vg lvm2 a- 35946496S 35946496S
/dev/sdc1 new_vg lvm2 a- 35946496S 35840000S
/dev/sdd1 new_vg lvm2 a- 35946496S 35946496S
9.4. Specifying Units
49