
Installation guide

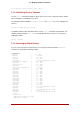
Table Of Contents
- LVM Administrator's Guide
- Table of Contents
- Introduction
- Chapter 1. The LVM Logical Volume Manager
- Chapter 2. LVM Components
- Chapter 3. LVM Administration Overview
- Chapter 4. LVM Administration with CLI Commands
- 1. Using CLI Commands
- 2. Physical Volume Administration
- 3. Volume Group Administration
- 3.1. Creating Volume Groups
- 3.2. Adding Physical Volumes to a Volume Group
- 3.3. Displaying Volume Groups
- 3.4. Scanning Disks for Volume Groups to Build the Cache File
- 3.5. Removing Physical Volumes from a Volume Group
- 3.6. Changing the Parameters of a Volume Group
- 3.7. Activating and Deactivating Volume Groups
- 3.8. Removing Volume Groups
- 3.9. Splitting a Volume Group
- 3.10. Combining Volume Groups
- 3.11. Backing Up Volume Group Metadata
- 3.12. Renaming a Volume Group
- 3.13. Moving a Volume Group to Another System
- 3.14. Recreating a Volume Group Directory
- 4. Logical Volume Administration
- 4.1. Creating Logical Volumes
- 4.2. Persistent Device Numbers
- 4.3. Resizing Logical Volumes
- 4.4. Changing the Parameters of a Logical Volume Group
- 4.5. Renaming Logical Volumes
- 4.6. Removing Logical Volumes
- 4.7. Displaying Logical Volumes
- 4.8. Growing Logical Volumes
- 4.9. Extending a Striped Volume
- 4.10. Shrinking Logical Volumes
- 5. Creating Snapshot Volumes
- 6. Controlling LVM Device Scans with Filters
- 7. Online Data Relocation
- 8. Activating Logical Volumes on Individual Nodes in a Cluster
- 9. Customized Reporting for LVM
- Chapter 5. LVM Configuration Examples
- Chapter 6. LVM Troubleshooting
- Chapter 7. LVM Administration with the LVM GUI
- Appendix A. The Device Mapper
- Appendix B. The LVM Configuration Files
- Appendix C. LVM Object Tags
- Appendix D. LVM Volume Group Metadata
- Index

2.2. Displaying Physical Volumes
There are three commands you can use to display properties of LVM physical volumes: pvs,
pvdisplay, and pvscan.
The pvs command provides physical volume information in a configurable form, displaying one
line per physical volume. The pvs command provides a great deal of format control, and is use-
ful for scripting. For information on using the pvs command to customize your output, see Sec-
tion 9, “Customized Reporting for LVM”.
The pvdisplay command provides a verbose multi-line output for each physical volume. It dis-
plays physical properties (size, extents, volume group, etc.) in a fixed format.
The following example shows the output of the pvdisplay command for a single physical
volume.
# pvdisplay
--- Physical volume ---
PV Name /dev/sdc1
VG Name new_vg
PV Size 17.14 GB / not usable 3.40 MB
Allocatable yes
PE Size (KByte) 4096
Total PE 4388
Free PE 4375
Allocated PE 13
PV UUID Joqlch-yWSj-kuEn-IdwM-01S9-XO8M-mcpsVe
The pvscan command scans all supported LVM block devices in the system for physical
volumes.
The following command shows all physical devices found:
# pvscan
PV /dev/sdb2 VG vg0 lvm2 [964.00 MB / 0 free]
PV /dev/sdc1 VG vg0 lvm2 [964.00 MB / 428.00 MB free]
PV /dev/sdc2 lvm2 [964.84 MB]
Total: 3 [2.83 GB] / in use: 2 [1.88 GB] / in no VG: 1 [964.84 MB]
You can define a filter in the lvm.conf so that this command will avoid scanning specific physical
volumes. For information on using filters to control which devices are scanned, see Section 6,
“Controlling LVM Device Scans with Filters”.
2.3. Preventing Allocation on a Physical Volume
You can prevent allocation of physical extents on the free space of one or more physical
volumes with the pvchange command. This may be necessary if there are disk errors, or if you
will be removing the physical volume.
The following command disallows the allocation of physical extents on /dev/sdk1.
pvchange -x n /dev/sdk1
You can also use the -xy arguments of the pvchange command to allow allocation where it had
2.3. Preventing Allocation on a Physical Volume
21