
Installation guide
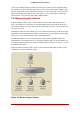

Table Of Contents
- LVM Administrator's Guide
- Table of Contents
- Introduction
- Chapter 1. The LVM Logical Volume Manager
- Chapter 2. LVM Components
- Chapter 3. LVM Administration Overview
- Chapter 4. LVM Administration with CLI Commands
- 1. Using CLI Commands
- 2. Physical Volume Administration
- 3. Volume Group Administration
- 3.1. Creating Volume Groups
- 3.2. Adding Physical Volumes to a Volume Group
- 3.3. Displaying Volume Groups
- 3.4. Scanning Disks for Volume Groups to Build the Cache File
- 3.5. Removing Physical Volumes from a Volume Group
- 3.6. Changing the Parameters of a Volume Group
- 3.7. Activating and Deactivating Volume Groups
- 3.8. Removing Volume Groups
- 3.9. Splitting a Volume Group
- 3.10. Combining Volume Groups
- 3.11. Backing Up Volume Group Metadata
- 3.12. Renaming a Volume Group
- 3.13. Moving a Volume Group to Another System
- 3.14. Recreating a Volume Group Directory
- 4. Logical Volume Administration
- 4.1. Creating Logical Volumes
- 4.2. Persistent Device Numbers
- 4.3. Resizing Logical Volumes
- 4.4. Changing the Parameters of a Logical Volume Group
- 4.5. Renaming Logical Volumes
- 4.6. Removing Logical Volumes
- 4.7. Displaying Logical Volumes
- 4.8. Growing Logical Volumes
- 4.9. Extending a Striped Volume
- 4.10. Shrinking Logical Volumes
- 5. Creating Snapshot Volumes
- 6. Controlling LVM Device Scans with Filters
- 7. Online Data Relocation
- 8. Activating Logical Volumes on Individual Nodes in a Cluster
- 9. Customized Reporting for LVM
- Chapter 5. LVM Configuration Examples
- Chapter 6. LVM Troubleshooting
- Chapter 7. LVM Administration with the LVM GUI
- Appendix A. The Device Mapper
- Appendix B. The LVM Configuration Files
- Appendix C. LVM Object Tags
- Appendix D. LVM Volume Group Metadata
- Index

Chapter 3. LVM Administration
Overview
This chapter provides an overview of the administrative procedures you use to configure LVM
logical volumes. This chapter is intended to provide a general understanding of the steps in-
volved. For specific step-by-step examples of common LVM configuration procedures, see
Chapter 5, LVM Configuration Examples.
For descriptions of the CLI commands you can use to perform LVM administration, see
Chapter 4, LVM Administration with CLI Commands. Alternately, you can use the LVM GUI,
which is described in Chapter 7, LVM Administration with the LVM GUI.
1. Creating LVM Volumes in a Cluster
Creating LVM logical volumes in a cluster environment is identical to creating LVM logical
volumes on a single node. There is no difference in the LVM commands themselves, or in the
LVM GUI interface. In order to enable the LVM volumes you are creating in a cluster, the cluster
infrastructure must be running and the cluster must be quorate.
For information on how to set up the cluster infrastructure, see Configuring and Managing a Red
Hat Cluster.
2. Logical Volume Creation Overview
The following is a summary of the steps to perform to create an LVM logical volume.
1. Initialize the partitions you will use for the LVM volume as physical volumes (this labels
them).
2. Create a volume group.
3. Create a logical volume.
After creating the logical volume you can create and mount the file system. The examples in this
document use GFS file systems.
1. Create a GFS file system on the logical volume with the gfs_mkfs command.
2. Create a new mount point with the mkdir command. In a clustered system, create the
mount point on all nodes in the cluster.
3. Mount the file system. You may want to add a line to the fstab file for each node in the sys-
tem.
Alternately, you can create and mount the GFS file system with the LVM GUI.
Creating the LVM volume is machine independent, since the storage area for LVM setup inform-
ation is on the physical volumes and not the machine where the volume was created. Servers
15