
Installation guide
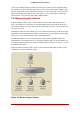

Table Of Contents
- LVM Administrator's Guide
- Table of Contents
- Introduction
- Chapter 1. The LVM Logical Volume Manager
- Chapter 2. LVM Components
- Chapter 3. LVM Administration Overview
- Chapter 4. LVM Administration with CLI Commands
- 1. Using CLI Commands
- 2. Physical Volume Administration
- 3. Volume Group Administration
- 3.1. Creating Volume Groups
- 3.2. Adding Physical Volumes to a Volume Group
- 3.3. Displaying Volume Groups
- 3.4. Scanning Disks for Volume Groups to Build the Cache File
- 3.5. Removing Physical Volumes from a Volume Group
- 3.6. Changing the Parameters of a Volume Group
- 3.7. Activating and Deactivating Volume Groups
- 3.8. Removing Volume Groups
- 3.9. Splitting a Volume Group
- 3.10. Combining Volume Groups
- 3.11. Backing Up Volume Group Metadata
- 3.12. Renaming a Volume Group
- 3.13. Moving a Volume Group to Another System
- 3.14. Recreating a Volume Group Directory
- 4. Logical Volume Administration
- 4.1. Creating Logical Volumes
- 4.2. Persistent Device Numbers
- 4.3. Resizing Logical Volumes
- 4.4. Changing the Parameters of a Logical Volume Group
- 4.5. Renaming Logical Volumes
- 4.6. Removing Logical Volumes
- 4.7. Displaying Logical Volumes
- 4.8. Growing Logical Volumes
- 4.9. Extending a Striped Volume
- 4.10. Shrinking Logical Volumes
- 5. Creating Snapshot Volumes
- 6. Controlling LVM Device Scans with Filters
- 7. Online Data Relocation
- 8. Activating Logical Volumes on Individual Nodes in a Cluster
- 9. Customized Reporting for LVM
- Chapter 5. LVM Configuration Examples
- Chapter 6. LVM Troubleshooting
- Chapter 7. LVM Administration with the LVM GUI
- Appendix A. The Device Mapper
- Appendix B. The LVM Configuration Files
- Appendix C. LVM Object Tags
- Appendix D. LVM Volume Group Metadata
- Index

Note
Mirrored logical volumes are not currently supported in a cluster.
For information on creating and modifying mirrors, see Section 4.1.3, “Creating Mirrored
Volumes”.
3.4. Snapshot Volumes
The LVM snapshot feature provides the ability to create virtual images of a device at a particular
instant without causing a service interruption. When a change is made to the original device (the
origin) after a snapshot is taken, the snapshot feature makes a copy of the changed data area
as it was prior to the change so that it can reconstruct the state of the device.
Note
LVM snapshots are not supported across the nodes in a cluster.
Because a snapshot copies only the data areas that change after the snapshot is created, the
snapshot feature requires a minimal amount of storage. For example, with a rarely updated ori-
gin, 3-5 % of the origin's capacity is sufficient to maintain the snapshot.
Note
Snapshot copies of a file system are virtual copies, not actual media backup for a
file system. Snapshots do not provide a substitute for a backup procedure.
If a snapshot runs full, the snapshot is dropped. This is to be sure that there is enough space for
the origin file system. You should regularly monitor the size of the snapshot. Snapshots are fully
resizeable, however, so if you have the storage capacity you can increase the size of the snap-
shot volume to prevent it from getting dropped. Conversely, if you find that the snapshot volume
is larger than you need, you can reduce the size of the volume to free up space that is needed
by other logical volumes.
When you create a snapshot file system, full read and write access to the origin stays possible.
If a chunk on a snapshot is changed, that chunk is marked and never gets copied from the ori-
ginal volume.
There are several uses for the snapshot feature:
• Most typically, a snapshot is taken when you need to perform a backup on a logical volume
without halting the live system that is continuously updating the data.
3.4. Snapshot Volumes
13