
Installation guide


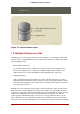
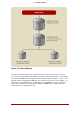

Table Of Contents
- LVM Administrator's Guide
- Table of Contents
- Introduction
- Chapter 1. The LVM Logical Volume Manager
- Chapter 2. LVM Components
- Chapter 3. LVM Administration Overview
- Chapter 4. LVM Administration with CLI Commands
- 1. Using CLI Commands
- 2. Physical Volume Administration
- 3. Volume Group Administration
- 3.1. Creating Volume Groups
- 3.2. Adding Physical Volumes to a Volume Group
- 3.3. Displaying Volume Groups
- 3.4. Scanning Disks for Volume Groups to Build the Cache File
- 3.5. Removing Physical Volumes from a Volume Group
- 3.6. Changing the Parameters of a Volume Group
- 3.7. Activating and Deactivating Volume Groups
- 3.8. Removing Volume Groups
- 3.9. Splitting a Volume Group
- 3.10. Combining Volume Groups
- 3.11. Backing Up Volume Group Metadata
- 3.12. Renaming a Volume Group
- 3.13. Moving a Volume Group to Another System
- 3.14. Recreating a Volume Group Directory
- 4. Logical Volume Administration
- 4.1. Creating Logical Volumes
- 4.2. Persistent Device Numbers
- 4.3. Resizing Logical Volumes
- 4.4. Changing the Parameters of a Logical Volume Group
- 4.5. Renaming Logical Volumes
- 4.6. Removing Logical Volumes
- 4.7. Displaying Logical Volumes
- 4.8. Growing Logical Volumes
- 4.9. Extending a Striped Volume
- 4.10. Shrinking Logical Volumes
- 5. Creating Snapshot Volumes
- 6. Controlling LVM Device Scans with Filters
- 7. Online Data Relocation
- 8. Activating Logical Volumes on Individual Nodes in a Cluster
- 9. Customized Reporting for LVM
- Chapter 5. LVM Configuration Examples
- Chapter 6. LVM Troubleshooting
- Chapter 7. LVM Administration with the LVM GUI
- Appendix A. The Device Mapper
- Appendix B. The LVM Configuration Files
- Appendix C. LVM Object Tags
- Appendix D. LVM Volume Group Metadata
- Index

Chapter 2. LVM Components
This chapter describes the components of an LVM Logical volume.
1. Physical Volumes
The underlying physical storage unit of an LVM logical volume is a block device such as a parti-
tion or whole disk. To use the device for an LVM logical volume the device must be initialized as
a physical volume (PV). Initializing a block device as a physical volume places a label near the
start of the device.
By default, the LVM label is placed in the second 512-byte sector. You can overwrite this default
by placing the label on any of the first 4 sectors. This allows LVM volumes to co-exist with other
users of these sectors, if necessary.
An LVM label provides correct identification and device ordering for a physical device, since
devices can come up in any order when the system is booted. An LVM label remains persistent
across reboots and throughout a cluster.
The LVM label identifies the device as an LVM physical volume. It contains a random unique
identifier (the UUID) for the physical volume. It also stores the size of the block device in bytes,
and it records where the LVM metadata will be stored on the device.
The LVM metadata contains the configuration details of the LVM volume groups on your sys-
tem. By default, an identical copy of the metadata is maintained in every metadata area in every
physical volume within the volume group. LVM metadata is small and stored as ASCII.
Currently LVM allows you to store 0, 1 or 2 identical copies of its metadata on each physical
volume. The default is 1 copy. Once you configure the number of metadata copies on the phys-
ical volume, you cannot change that number at a later time. The first copy is stored at the start
of the device, shortly after the label. If there is a second copy, it is placed at the end of the
device. If you accidentally overwrite the area at the beginning of your disk by writing to a differ-
ent disk than you intend, a second copy of the metadata at the end of the device will allow you
to recover the metadata.
For detailed information about the LVM metadata and changing the metadata parameters, see
Appendix D, LVM Volume Group Metadata.
1.1. LVM Physical Volume Layout
Figure 2.1, “Physical Volume layout” shows the layout of an LVM physical volume. The LVM la-
bel is on the second sector, followed by the metadata area, followed by the usable space on the
device.
Note
In the Linux kernel (and throughout this document), sectors are considered to be
6