
Installation guide


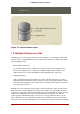
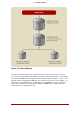

Table Of Contents
- LVM Administrator's Guide
- Table of Contents
- Introduction
- Chapter 1. The LVM Logical Volume Manager
- Chapter 2. LVM Components
- Chapter 3. LVM Administration Overview
- Chapter 4. LVM Administration with CLI Commands
- 1. Using CLI Commands
- 2. Physical Volume Administration
- 3. Volume Group Administration
- 3.1. Creating Volume Groups
- 3.2. Adding Physical Volumes to a Volume Group
- 3.3. Displaying Volume Groups
- 3.4. Scanning Disks for Volume Groups to Build the Cache File
- 3.5. Removing Physical Volumes from a Volume Group
- 3.6. Changing the Parameters of a Volume Group
- 3.7. Activating and Deactivating Volume Groups
- 3.8. Removing Volume Groups
- 3.9. Splitting a Volume Group
- 3.10. Combining Volume Groups
- 3.11. Backing Up Volume Group Metadata
- 3.12. Renaming a Volume Group
- 3.13. Moving a Volume Group to Another System
- 3.14. Recreating a Volume Group Directory
- 4. Logical Volume Administration
- 4.1. Creating Logical Volumes
- 4.2. Persistent Device Numbers
- 4.3. Resizing Logical Volumes
- 4.4. Changing the Parameters of a Logical Volume Group
- 4.5. Renaming Logical Volumes
- 4.6. Removing Logical Volumes
- 4.7. Displaying Logical Volumes
- 4.8. Growing Logical Volumes
- 4.9. Extending a Striped Volume
- 4.10. Shrinking Logical Volumes
- 5. Creating Snapshot Volumes
- 6. Controlling LVM Device Scans with Filters
- 7. Online Data Relocation
- 8. Activating Logical Volumes on Individual Nodes in a Cluster
- 9. Customized Reporting for LVM
- Chapter 5. LVM Configuration Examples
- Chapter 6. LVM Troubleshooting
- Chapter 7. LVM Administration with the LVM GUI
- Appendix A. The Device Mapper
- Appendix B. The LVM Configuration Files
- Appendix C. LVM Object Tags
- Appendix D. LVM Volume Group Metadata
- Index

Using logical volumes, you can take device snapshots for consistent backups or to test the
effect of changes without affecting the real data.
The implementation of these features in LVM is described in the remainder of this document.
2. LVM Architecture Overview
For the RHEL 4 release of the Linux operating system, the original LVM1 logical volume man-
ager was replaced by LVM2, which has a more generic kernel framework than LVM1. LVM2
provides the following improvements over LVM1:
• flexible capacity
• more efficient metadata storage
• better recovery format
• new ASCII metadata format
• atomic changes to metadata
• redundant copies of metadata
LVM2 is backwards compatible with LVM1, with the exception of snapshot and cluster support.
You can convert a volume group from LVM1 format to LVM2 format with the vgconvert com-
mand. For information on converting LVM metadata format, see the vgconvert(8) man page.
The underlying physical storage unit of an LVM logical volume is a block device such as a parti-
tion or whole disk. This device is initialized as an LVM physical volume (PV).
To create an LVM logical volume, the physical volumes are combined into a volume group (VG).
This creates a pool of disk space out of which LVM logical volumes (LVs) can be allocated. This
process is analogous to the way in which disks are divided into partitions. A logical volume is
used by file systems and applications (such as databases).
Figure 1.1, “LVM Logical Volume Components” shows the components of a simple LVM logical
volume:
2. LVM Architecture Overview
2