
Installation guide
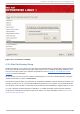
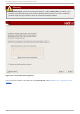

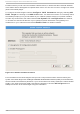

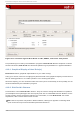
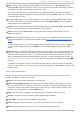

Fig u re 4 .16 . Part it io n in g wit h Disk Dru id o n x86 , AMD6 4 , an d In t el® 6 4 Syst ems
The partitioning tool used by the installation program is Disk Dru id . With the exception of certain
esoteric situations, Disk Dru id can handle the partitioning requirements for a typical installation.
4 .19.1. Graphical Display of Hard Drive(s)
Disk Dru id offers a graphical representation of your hard drive(s).
Using your mouse, click once to highlight a particular field in the graphical display. D ouble-click to
edit an existing partition or to create a partition out of existing free space.
Above the display, you can review the name of the drive (such as /dev/hda), its size (in MB), and its
model as detected by the installation program.
4 .19.2. Disk Druid's But t ons
These buttons control D isk Dru id ' s actions. They are used to change the attributes of a partition
(for example the file system type and mount point) and also to create RAID devices. Buttons on this
screen are also used to accept the changes you have made, or to exit Disk Dru id . For further
explanation, take a look at each button in order:
New: Used to request a new partition. When selected, a dialog box appears containing fields
(such as the mount point and size fields) that must be filled in.
Red Hat Ent erprise Linux 5 Inst allat ion G uide
4 4