
Installation guide


USB pen drive — Your machine supports booting from a USB device.
PXE boot via network — Your machine supports booting from the network. This is an advanced
installation path. Refer to Chapter 34, PXE Network Installations for additional information on this
method.
To create a boot CD -ROM or to prepare your USB pen drive for installation, refer to Section 2.4.1,
“ Alternative Boot Methods” .
Insert the boot media and reboot the system. Your BIOS settings may need to be changed to allow
you to boot from the CD-ROM or USB device.
Note
To change your BIOS settings on an x86, AMD64, or Intel® 64 system, watch the instructions
provided on your display when your computer first boots. A line of text appears, telling you
which key to press to enter the BIOS settings.
Once you have entered your BIOS setup program, find the section where you can alter your
boot sequence. The default is often C, A or A, C (depending on whether you boot from your
hard drive [C] or a diskette drive [A]). Change this sequence so that the CD-ROM is first in your
boot order and that C or A (whichever is your typical boot default) is second. This instructs the
computer to first look at the CD-ROM drive for bootable media; if it does not find bootable
media on the CD-ROM drive, it then checks your hard drive or diskette drive.
Save your changes before exiting the BIOS. For more information, refer to the documentation
that came with your system.
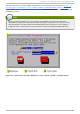
After a short delay, a screen containing the boot: prompt should appear. The screen contains
information on a variety of boot options. Each boot option also has one or more help screens
associated with it. To access a help screen, press the appropriate function key as listed in the line at
the bottom of the screen.
As you boot the installation program, be aware of two issues:
Once the boot: prompt appears, the installation program automatically begins if you take no
action within the first minute. To disable this feature, press one of the help screen function keys.
If you press a help screen function key, there is a slight delay while the help screen is read from
the boot media.
Normally, you only need to press Enter to boot. Be sure to watch the boot messages to review if the
Linux kernel detects your hardware. If your hardware is properly detected, continue to the next
section. If it does not properly detect your hardware, you may need to restart the installation and use
one of the boot options provided in Chapter 8, Additional Boot Options for Intel® and AMD Systems.
4 .4 .2. Boot ing t he Inst allat ion Program on It anium Syst ems
Your Itanium system should be able to boot the Red Hat Enterprise Linux installation program directly
from the Red Hat Enterprise Linux CD #1. If your Itanium cannot boot the installation program from
the CD-ROM (or if you want to perform a hard drive, NFS, FTP, or HTTP installation) you must boot
from an LS-120 diskette. Refer to Section 4.4.2.2, “ Booting the Installation Program from an LS-120
Diskette” for more information.
Red Hat Ent erprise Linux 5 Inst allat ion G uide
24