
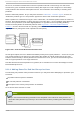
Installation guide


There are several disk management software products on the market. Do some research to
find the one that is best for your situation.
While the process of non-destructive repartitioning is rather straightforward, there are a
number of steps involved:
Compress and backup existing data
Resize the existing partition
Create new partition(s)
Next we will look at each step in a bit more detail.
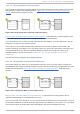
26 .1.4 .3.1. Co mp ress exist in g d at a
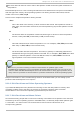
As Figure 26.11, “Disk Drive Being Compressed” , shows, the first step is to compress the data in your
existing partition. The reason for doing this is to rearrange the data such that it maximizes the
available free space at the "end" of the partition.
Fig u re 26 .11. Disk Drive Bein g Co mp ressed
In Figure 26.11, “ Disk Drive Being Compressed” , 1 represents before and 2 represents after.
This step is crucial. Without it, the location of your data could prevent the partition from being resized
to the extent desired. Note also that, for one reason or another, some data cannot be moved. If this is
the case (and it severely restricts the size of your new partition(s)), you may be forced to destructively
repartition your disk.
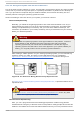
26 .1.4 .3.2. Resiz e t h e exist in g p art it io n
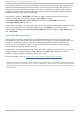
Figure 26.12, “ Disk Drive with Partition Resized” , shows the actual resizing process. While the actual
result of the resizing operation varies depending on the software used, in most cases the newly freed
space is used to create an unformatted partition of the same type as the original partition.
Fig u re 26 .12. Disk Drive wit h Part it io n Resiz ed
In Figure 26.12, “ Disk D rive with Partition Resized” , 1 represents before and 2 represents after.
Chapt er 2 6 . An Int roduct ion t o Disk Part it ions
261