
Installation guide


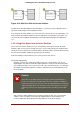

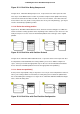


Figure 25.11. Disk Drive Being Compressed
In Figure 25.11, “Disk Drive Being Compressed”, 1 represents before and 2 represents after.
This step is crucial. Without it, the location of your data could prevent the partition from being
resized to the extent desired. Note also that, for one reason or another, some data cannot be
moved. If this is the case (and it severely restricts the size of your new partition(s)), you may be
forced to destructively repartition your disk.
1.4.3.2. Resize the existing partition
Figure 25.12, “Disk Drive with Partition Resized”, shows the actual resizing process. While the
actual result of the resizing operation varies depending on the software used, in most cases the
newly freed space is used to create an unformatted partition of the same type as the original
partition.
Figure 25.12. Disk Drive with Partition Resized
In Figure 25.12, “Disk Drive with Partition Resized”, 1 represents before and 2 represents after.
It is important to understand what the resizing software you use does with the newly freed
space, so that you can take the appropriate steps. In the case we have illustrated, it would be
best to delete the new DOS partition and create the appropriate Linux partition(s).
1.4.3.3. Create new partition(s)
As the previous step implied, it may or may not be necessary to create new partitions. However,
unless your resizing software is Linux-aware, it is likely that you must delete the partition that
was created during the resizing process. Figure 25.13, “Disk Drive with Final Partition Configur-
ation”, shows this being done.
Figure 25.13. Disk Drive with Final Partition Configuration
1.4. Making Room For Red Hat Enterprise Linux
230