
Installation guide

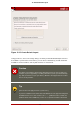


Figure 12.16. Partitioning with Disk Druid on IBM System p and System i
systems
The partitioning tool used by the installation program is Disk Druid. With the exception of cer-
tain esoteric situations, Disk Druid can handle the partitioning requirements for a typical install-
ation.
19.1. Graphical Display of Hard Drive(s)
Disk Druid offers a graphical representation of your hard drive(s).
Using your mouse, click once to highlight a particular field in the graphical display. Double-click
to edit an existing partition or to create a partition out of existing free space.
Above the display, you can review the Drive name (such as /dev/hda), the Geom (which shows
the hard disk's geometry and consists of three numbers representing the number of cylinders,
heads, and sectors as reported by the hard disk), and the Model of the hard drive as detected
by the installation program.
19.2. Disk Druid's Buttons
These buttons control Disk Druid's actions. They are used to change the attributes of a parti-
tion (for example the file system type and mount point) and also to create RAID devices. But-
tons on this screen are also used to accept the changes you have made, or to exit Disk Druid.
For further explanation, take a look at each button in order:
19.1. Graphical Display of Hard Drive(s)
118