
Installation guide


34 Chapter 4. Installing Red Hat Enterprise Linux
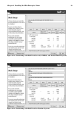
• Mount Point: Enter the partition’s mount point. For example, if this partition should be the root
partition, enter /; enter /boot for the /boot partition, and so on. You can also use the pull-down
menu to choose the correct mount point for your partition.
• File System Type: Using the pull-down menu, select the appropriate file system type for this parti-
tion. For more information on file system types, refer to Section 4.16.5.1 File System Types.
• Allowable Drives: This field contains a list of the hard disks installed on your system. If a hard
disk’s box is highlighted, then a desired partition can be created on that hard disk. If the box is
not checked, then the partition will never be created on that hard disk. By using different checkbox
settings, you can have Disk Druid place partitions where you need them, or let Disk Druid decide
where partitions should go.
• Size (MB): Enter the size (in megabytes) of the partition. Note, this field starts with 100 MB; unless
changed, only a 100 MB partition will be created.
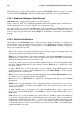
• Additional Size Options: Choose whether to keep this partition at a fixed size, to allow it to "grow"
(fill up the available hard drive space) to a certain point, or to allow it to grow to fill any remaining
hard drive space available.
If you choose Fill all space up to (MB), you must give size constraints in the field to the right of
this option. This allows you to keep a certain amount of space free on your hard drive for future
use.
• Force to be a primary partition: Select whether the partition you are creating should be one of
the first four partitions on the hard drive. If unselected, the partition is created as a logical parti-
tion. Refer to Section D.1.3 Partitions within Partitions — An Overview of Extended Partitions, for
more information.
• OK: Select OK once you are satisfied with the settings and wish to create the partition.
• Cancel: Select Cancel if you do not want to create the partition.
4.16.5.1. File System Types
Red Hat Enterprise Linux allows you to create different partition types, based on the file system they
will use. The following is a brief description of the different file systems available, and how they can
be utilized.
• ext2 — An ext2 file system supports standard Unix file types (regular files, directories, symbolic
links, etc). It provides the ability to assign long file names, up to 255 characters.
• ext3 — The ext3 file system is based on the ext2 file system and has one main advantage —
journaling. Using a journaling file system reduces time spent recovering a file system after a crash
as there is no need to fsck
1
the file system. The ext3 file system is selected by default and is highly
recommended.
• physical volume (LVM) — Creating one or more physical volume (LVM) partitions allows you
to create an LVM logical volume. LVM can improve performance when using physical disks. For
more information regarding LVM, refer to the Red Hat Enterprise Linux System Administration
Guide.
• software RAID — Creating two or more software RAID partitions allows you to create a RAID
device. For more information regarding RAID, refer to the chapter RAID (Redundant Array of
Independent Disks) in the Red Hat Enterprise Linux System Administration Guide.
• swap — Swap partitions are used to support virtual memory. In other words, data is written to a
swap partition when there is not enough RAM to store the data your system is processing. Refer to
the Red Hat Enterprise Linux System Administration Guide for additional information.
1. The fsck application is used to check the file system for metadata consistency and optionally repair one or
more Linux file systems.