
Installation guide


20 Chapter 4. Installing Red Hat Enterprise Linux
• a — first IDE controller, master
• b — first IDE controller, slave
• c — second IDE controller, master
• d — second IDE controller, slave
If you have a third and/or fourth controller, continue assigning letters in alphabetical order, going from
controller to controller, and master to slave.
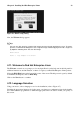
4.6. Installing from a Hard Drive
The Select Partition screen applies only if you are installing from a disk partition (that is, if you
selected Hard Drive in the Installation Method dialog). This dialog allows you to name the disk
partition and directory from which you are installing Red Hat Enterprise Linux.
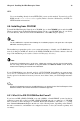
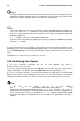
Figure 4-3. Selecting Partition Dialog for Hard Drive Installation
Enter the device name of the partition containing the Red Hat Enterprise Linux ISO images. There is
also a field labeled Directory holding images.
If the ISO images are in the root (top-level) directory of a partition, enter a /. If the ISO images
are located in a subdirectory of a mounted partition, enter the name of the directory holding the
ISO images within that partition. For example, if the partition on which the ISO images is normally
mounted as /home/, and the images are in /home/new/, you would enter /new/.
After you have identified the disk partition, the Welcome dialog appears.
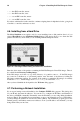
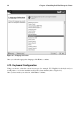
4.7. Performing a Network Installation
If you are performing a network installation, the Configure TCP/IP dialog appears. This dialog asks
for your IP and other network addresses. You can choose to configure the IP address and Netmask of
the device via DHCP or manually. If manually, enter the IP address you are using during installation
and press [Enter]. The installation program attempts to guess your Netmask based on your IP address;
you may change the netmask if it is incorrect. Press [Enter]. The installation program guesses the
Default gateway and Primary nameserver addresses from your IP address and netmask; you may
change them if they are incorrect.