Linux® Version 5.4 Release Notes December 2009 R EA D TH INS M IS TA E B PR LL EF O IN OR D G E U C T 0898003-5.
Disclaimer The information contained in this document is subject to change without notice. Concurrent Computer Corporation has taken efforts to remove errors from this document, however, Concurrent Computer Corporation’s only liability regarding errors that may still exist is to correct said errors upon their being made known to Concurrent Computer Corporation. License Duplication of this manual without the written consent of Concurrent Computer Corporation is prohibited.
Contents Chapter 0 1.0 Introduction . . . . . . . . . . . . . . . . . . . . . . . . . . . . . . . . . . . . . . 1 2.0 3.0 4.0 5.0 1.1 1.2 1.3 1.4 1.5 Product Description . . . . . . . . . . . . . . . . . . . . . . . . . . . Product Media . . . . . . . . . . . . . . . . . . . . . . . . . . . . . . . . Version Numbers . . . . . . . . . . . . . . . . . . . . . . . . . . . . . System Updates . . . . . . . . . . . . . . . . . . . . . . . . . . . . . . Syntax Notation . . . . . . . . . . . . . . . . . . . .
Contents 5.8 Installing RedHawk Updates from the Updates Web Site . . . . . . . . . . . . . . . . . . . . . . . . . . . . . . . . . . . . . . . . 42 6.0 Upgrade Procedures . . . . . . . . . . . . . . . . . . . . . . . . . . . . . 43 6.1 6.2 6.3 6.4 6.5 6.6 6.7 6.8 6.9 Pre-Upgrade Procedure . . . . . . . . . . . . . . . . . . . . . . . 43 Upgrading to RHEL5.4 . . . . . . . . . . . . . . . . . . . . . . . . 44 Updating Red Hat Software . . . . . . . . . . . . . . . . . . . .
Introduction 1.0. Introduction This document provides release information and installation instructions for Concurrent Computer Corporation’s RedHawkTM Linux® operating system Version 5.4 1.1 Product Description RedHawk Linux is a real-time version of the open source Linux operating system. Modifications are made to standard Linux version 2.6 to support the functionality and the performance required by complex real-time applications.
Introduction 1.2 • NightProbe™ data monitor – used to sample, record or modify program data in multiple running programs. • NightTune™ performance tuner – used for analyzing system and application performance. Product Media The tables below list the optical media discs that are delivered with RedHawk Linux Version 5.4 for each Concurrent system. WARNING While much of the software on the RedHawk media is licensed under the GNU GPL license, some components are not.
Introduction 64-Bit Product Media Processor Type: AMD Opteron™ 64-bit and EM64T x86_64 64-bit Model: iHawk 860 Series [ HQ685, 680, 285, 280, 185, 069, 067, 049, 047, T74, T54, R54, R90, 000 ] iHawk 870 Series [ HR844, 430, 221, 210, 00W, 00T ] iHawk 880 Series [ HQHS2 ] ImaGen [ HQ0G1, HR0G1 ] Operating System Discs: Red Hat Enterprise Linux 5.4 (64-bit) (1 DVD) Red Hat Enterprise Linux 5.4 Source (64-bit) (1 DVD) Red Hat Enterprise Linux 5.
Introduction 1.4 System Updates As RedHawk Linux updates are issued, they are made available for downloading from Concurrent’s Software Portal. NOTE Concurrent does not recommend downloading Red Hat updates. The RedHawk Linux kernel replaces the standard Red Hat kernel and is likely to work with any version of the Red Hat distribution. However, installing upgrades, especially to gcc and glibc, from sources other than Concurrent may destabilize the system and is not recommended.
Documentation 2.0. Documentation 2.1 RedHawk Linux Documentation Table 2-1 lists the documentation provided with RedHawk Version 5.4 as PDF files. After installing RedHawk Linux documentation, the files are available for viewing: • • • by clicking on the “Documents” icon on the desktop by clicking on the red document entry hyperlinks within the documents, including Table 2-1 below. Optional product documentation is available only if the product has been installed.
Documentation 2.2 Vendor Documentation Red Hat Enterprise Linux operating system documentation is included as PDF files on the Red Hat media delivered with RedHawk Linux. Some RedHawk optional products include vendor documentation that facilitates using these RedHawk products. Commercial off-the-shelf (COTS) documentation applicable to your iHawk system is included with the system. Contact the vendor’s sales office to purchase additional copies. 6 RedHawk Linux Version 5.
Prerequisites 3.0. Prerequisites 3.1 Software No previously installed software is required in order to install RedHawk Linux. The complete RedHawk Linux installation consists of the following software: • • • • • • • • Red Hat Enterprise Linux 5.
Changes in this Release 4.0. Changes in this Release This section describes enhancements and other changes introduced in Version 5.4. 4.1 Enhancements in Version 5.4 4.1.1 RedHawk Based on RHEL 5.4 RedHawk Version 5.4 uses Red Hat Enterprise Linux 5.4 as its base with a merge of kernel.org version 2.6.31. 4.1.2 Updated NVIDIA Support RedHawk Version 5.4 includes the NVIDIA Linux Display Driver version 190-42.
Changes in this Release 4.1.7 Pre-Installed NVIDIA CUDA Support RedHawk 5.4 includes pre-installed NVIDIA CUDA libraries and header files. In addition, example code is provided. See /usr/share/doc/ccur/examples/cuda for more information. 4.1.8 NUMA Support For 32-bit Systems Concurrent’s NUMA extensions and enhancements are now available on 32-bit systems, in addition to 64-bit systems.
Changes in this Release For private variables, the services mentioned are optional. Note that a shared variable is one which different processes access, and a private variable is one which only multiple threads of a single process access. Failure to correctly mark shared variables as shared will cause silent corruption in glibc behavior, resulting in an eventual user-space stall, in glibc itself, in one or more of the applications referencing the shared mutex or condition variable. 4.2.
Changes in this Release Note that this change applies only to the FBS C library. The FBS Fortran library has not been modified for this release. RedHawk Linux Version 5.
Installation Procedures 5.0. Installation Procedures Use the installation procedures provided here to generate or regenerate a system. If upgrading from Version 5.1 or 5.2 to Version 5.4, follow the steps in “Upgrade Procedures” on page 43. Review the following points before installing the software: • Concurrent recommends these procedures be followed as documented here; however, advanced users may decide to make other choices based on onsite requirements.
Installation Procedures 5.1.1 Installing Red Hat This section typically takes between 40-70 minutes to complete. 1. Power on the system, if needed, to open the DVD drawer. 2. Insert Red Hat Enterprise Linux Installation Disc 1 in the drive and power down the system. 3. Power on the system with the installation disc installed to boot from the disc. After a short delay, a screen containing the boot: prompt should appear. 4.
Installation Procedures If your system contains disk drives or devices that are not supported by the Red Hat installation program, you will need to obtain the necessary driver(s) in order to install Red Hat Enterprise Linux. A diskette containing the driver may be included with your system or it may be available on the Red Hat installatio n m edia. I f not available, co ntact the driver manufacturer for an updated driver or call Concurrent Support (see "Direct Software Support" on page 83).
Installation Procedures 6. At the Welcome screen, no action is needed. Press Enter to proceed. 7. Select your desired language and keyboard layout on the next two screens, pressing Next at each to proceed. 8. After selecting your keyboard layout, a dialog will appear which requests an installation number. Select the Installation Number radio button, enter 6d70-bd33-6d3c-fcbc in the text field, and click the OK button. RedHawk Linux Version 5.
Installation Procedures 9. The dialog as shown below will appear. If you are installing Red Hat, select the Install Red Hat Enterprise Linux Client radio button and click Next. If you are upgrading from RedHawk Version 5.1 or 5.2, select “Upgrade an existing Installation” and go to page 44 for further instructions. 10. The next step involves partitioning the disk. Select the Create custom layout option from the option list and check any physical disks shown in the table that you may wish to partition.
Installation Procedures NOTE If you encounter a problem because the installer cannot read the partition table on your disk, select Create custom layout, click on Review and modify partitioning layout, then click the Next button. Click OK on any warning dialogs that may appear. a. Select a disk of interest and delete all partitions on the disk so that all that remains is free space. WARNING: This action will erase all data on the disk when the disk is formatted in the next step. RedHawk Linux Version 5.
Installation Procedures b. Now press the New button to configure the /boot partition. Type /boot into the Mount Point text field, select ext3 as the File System Type, and specify a Size of 1000 MB. Select the Fixed size radio button and check the Force to be a primary partition checkbox. The Add Partition dialog should appear as below, except perhaps for the notation of the disk in the Allowable Drives section. Click the OK button. c. Click the New button to add the root partition.
Installation Procedures Select the Fixed size radio button and check the Force to be a primary partition checkbox. Select an appropriate size for the root partition. For large disks, a size of 60,000MB is recommended. The remaining space will be used for a partition of general use in step e below. It is recommended to separate the root partition from the remainder of the disk to make regenerating systems simpler, avoiding the need to back up the lion’s share of the disk.
Installation Procedures Click the OK button. e. Unless you used the entire contents of the disk in step c above, configure a /home partition for general use which uses the remaining free space on the disk. f. The disk partitioning dialog should look similar to the following, except for device names and sizes as selected in the previous steps. Click Next to continue. 20 RedHawk Linux Version 5.
Installation Procedures 11. The next dialog determines where the system boot information will be stored. Select “The GRUB boot loader will be installed on” radio button and click Next. 12. The next dialog defines networking configuration options. Select a network device from the list and then select either the DHCP or Manual radio button. Then click Edit. a. Ensure that the Enable IPv4 support checkbox is checked and the Enable IPv6 support checkbox is not checked. RedHawk Linux Version 5.
Installation Procedures b. For Manual configuration, enter your IP Address and Netmask in the text fields. c. Click OK to close the Edit dialog. d. The Networking screen now shows your configuration. If you choose Manual configuration, you also need to fill in the host name next to the manually text field, and the Gateway, Primary DNS and Secondary DNS fields in the Miscellaneous Settings section of the Networking dialog. Make any final required changes. e.
Installation Procedures 14. The Select Packages screen now appears. Ensure that Office, Multimedia and Software Development boxes are checked. Select the Customize Now radio button and click Next. 15. The following screen will appear which lists the major categories of software on the left and the major sub-sections within each category on the right. For Desktop Environments, check both GNOME and KDE selections. RedHawk Linux Version 5.
Installation Procedures 16. In addition to selecting the major sub-sections in each category, you can add additional optional packages to the installation. It is recommended that you select every package available in every sub-section, except in the Language category (explained in the next step). In GUI mode: A quick way to select all sub-sections and all optional packages for all sub-sections within a category is to use multiple selection and the right-click menu.
Installation Procedures 18. After completing software customization, press the Next button. This causes the installer to check for package dependencies. 19. After dependency checking is complete, the following screen is shown. Click Next to continue. 20. After package dependencies have been completed, installation begins. No action is required from you during this stage. RedHawk Linux Version 5.
Installation Procedures 21. When installation is complete, the following dialog appears. Remove the media from the DVD device and click Reboot to continue. The system will now restart and boot Red Hat from your disk. Several more steps are required before we are finished with the Installing Red Hat. 26 RedHawk Linux Version 5.
Installation Procedures 22. After the initial boot screen completes, the following screen appears. Click Forward to proceed. 23. The License Agreement screen appears. Click Yes, I agree to the License Agreement, and then click Forward. RedHawk Linux Version 5.
Installation Procedures 24. The next screen controls the firewall configuration. Select Disabled from the option list to disable the firewall. If your system will be on a public network that is not behind a firewall, you may wish to enable it. Click Forward to continue. 25. If you disabled the firewall in the previous step, the following warning dialog appears. Click Yes. 28 RedHawk Linux Version 5.
Installation Procedures 26. The next screen controls the settings of SELinux. Select Disabled from the option list and click Forward. 27. The following warning dialog will appear. Click Yes. RedHawk Linux Version 5.
Installation Procedures 28. The next screen controls the configuration of Kdump. Ensure that the Enable Kdump checkbox is not set. The installation of RedHawk in a subsequent step installs an improved system dump utility which will be automatically configured. Click Forward. 29. On the next screen, set the date and time and configure the Network Time Protocol daemon if desired. 30. The next screen asks you to register with Red Hat for software updates.
Installation Procedures 31. A warning dialog will appear. Click No thanks, I’ll connect later, to continue. RedHawk Linux Version 5.
Installation Procedures 32. Another warning will appear on the Finish Updates Setup window. Click Forward to continue. 33. Optionally configure a user, NIS, and your sound card on the next two screens. 34. The final screen will prompt you for additional CDs. Do not click the Install... button -- the remaining software will be installed in a subsequent step. Click Finish, and then subsequently OK in the dialog which indicates a reboot is required.
Installation Procedures 5.1.2 Installing Red Hat Updates Install the disc labeled RHEL 5.4 Updates. This contains the latest updates released by Red Hat which have been validated by Concurrent on RedHawk Linux. These updates are important to the proper operation of RedHawk Linux. Execute the following instructions on the console or in a terminal window running as root. 1. Log in as root and take the system down to single-user mode: a. If in GUI mode, right click on the desktop and select Open Terminal. b.
Installation Procedures NOTE If you cannot execute the install-updates script (it fails with Permission Denied), or if you attempt to execute it by launching it from a file browser and it immediately returns, the optical media may have been mounted with the noexec option. Run the mount command (without arguments) and check the options.
Installation Procedures Dependency checking is performed, and finally, updating of packages is executed. No action is required of you during this step. 4. When the update completes, execute the following commands: cd .. eject NOTE: If there is more than one media device, you must specify the device to be ejected; e.g., eject /dev/hda. 5. Remove the disc from the optical media drive and store. 6. Type “reboot” at the system prompt and verify that the new Red Hat kernel boots. 7.
Installation Procedures 4. Execute the following commands to install RedHawk Linux, substituting the actual mount point used for your optical media device for /media/dvd if necessary: cd /media/dvd ./install-redhawk NOTES NOTE 1: Special instructions are displayed during the installation that may require appropriate action, such as video card installation and configuration. Follow the on-screen instructions until the installation script completes.
Installation Procedures 9. Reboot the system choosing the new RedHawk kernel and verify that the system boots properly. 10. Continue with the next section if an RCIM is to be installed. Otherwise, proceed to the following section to install Frequency-Based Scheduler (FBS). 5.3 Installing the RCIM The following serves as an installation checklist for installing a PCI-based RCIM board in an iHawk system. If an RCIM is not installed in your iHawk system, it should be installed now.
Installation Procedures 7. If you have the optional GPS module, attach the antenna lead and mount the antenna. The antenna should be mounted on the rooftop or in an open area. 8. Close the case and reconnect all power cords. 9. Power up the system and verify the system boots up properly. Refer to the RCIM guide for configuration options. 5.3.2 Verifying RCIM Operation 1.
Installation Procedures c. Install the RPM via the following command: # rpm -ivh ccur-ntp*.rpm 2. After your system is completely installed, refer to the Real-Time Clock and Interrupt Module (RCIM) User’s Guide for instructions for configuring ntp. 5.4 Installing Frequency-Based Scheduler (FBS) Software FBS is an optional package to RedHawk Linux. If you will be using FBS, install it at this time by performing the following steps: 1. With RedHawk Linux Version 5.
Installation Procedures file for this manual is available for viewing by clicking on the “Documents” icon on the desktop. 2. To install the PCI adapter in your iHawk system: a. Power down the system. b. Locate a vacant PCI card slot in the chassis that supports a bus master. c. Remove the metal plate that covers the cable exit at the rear of the chassis. d. Insert the PCI adapter card into the connector. e. Fasten the adapter card in place with the mounting screw. f. Replace the cover. 3.
Installation Procedures 4. To install, execute the following commands: cd /media/dvd ./install-sbsvme Follow the on-screen instructions until the installation script completes. 5. When the installation completes, execute the following commands: cd .. eject 6. Remove the disc from the optical media drive and store. 7. Exit single-user mode (Ctrl-D). Refer to the “PCI-to-VME Support” chapter of the RedHawk Linux User’s Guide for configuration and usage information.
Installation Procedures With NUU up-to-date, from the NUU Main window, click on the Select Update of All Out-of-Date button, then click on the Apply Actions button to install all listed product updates. 5. When the installation completes, execute the following commands: cd .. eject 6. Remove the disc from the optical media drive and store. 7. If there are more update discs, repeat these steps to install all updates. 8.
Upgrade Procedures 6.0. Upgrade Procedures Use the upgrade procedures provided here only if you are upgrading from Version 5.1 or 5.2 to Version 5.4. If generating or regenerating a RedHawk 5.4 system, migrating a system from Version 4.2 or earlier, or converting a system from 32-bit to 64-bit, follow the steps in “Installation Procedures” on page 12.
Upgrade Procedures 6.2 Upgrading to RHEL5.4 NOTE If you are upgrading to RedHawk 5.4 from a RedHawk 5.1 system, please note that you might see problems with 3 packages during the Red Hat upgrade procedure: openmpi, rhnsd and lamlibs. These problems are due to Red Hat, not Concurrent. For the current recommended resolution of these issues, see these links: http://kbase.redhat.com/faq/docs/DOC-19442 http://rhn.redhat.com/errata/RHBA-2008-0481.
Upgrade Procedures NOTE Unless you are an advanced user knowledgeable about this type of procedure, do not select other options; otherwise, you may not be able to boot the system after the upgrade process completes. Click Next to continue. RedHawk Linux Version 5.
Upgrade Procedures You will see the “progress bar” showing “Retrieving Installation Information” followed by “Checking dependencies in packages selected for installation”. 4. After the dependency check completes, you are prompted to begin the upgrade process. This is your last to chance to abort. Click Next when you are ready to begin the upgrade. No action is required from you during this stage. 46 RedHawk Linux Version 5.
Upgrade Procedures 5. Monitor the progress of the upgrade: “Transferring the install image to hard drive”, “Starting the install process, this may take several minutes”. After the install process begins, another progress bar displays with messages that provide details as packages are updated, including the remaining time estimated until completion (the actual time is usually faster than indicated) along with the current percentage of packages that have completed installing. RedHawk Linux Version 5.
Upgrade Procedures 6. After 100% of the packages are installed, remove the installation media and reboot. 6.3 Updating Red Hat Software The disc labeled RHEL 5.4 Updates contains the latest updates released by Red Hat and validated against RedHawk Linux. These updates are important to the proper operation of RedHawk Linux. To update the installed Red Hat software, perform the following steps. 1. If not already running Red Hat Enterprise Linux, boot the system with the Red Hat kernel. 2.
Upgrade Procedures mount /dev/dvd /media/dvd cd /media/dvd ./install-updates 6. When complete, issue the following commands to remove the disc: cd .. eject NOTE: If there is more than one media device, you must specify the device to be ejected; e.g., eject /dev/hda. 7. Type “reboot” at the system prompt, then select the updated Red Hat Enterprise Linux kernel and verify that the updated kernel boots. Continue with the steps in the following section. 6.4 Upgrading to RedHawk Version 5.
Upgrade Procedures mount /dev/dvd /media/dvd cd /media/dvd ./install-redhawk NOTES NOTE 1: Special instructions are displayed during the installation that may require appropriate action, such as video card installation and configuration. Follow the on-screen instructions until the installation script completes. NOTE 2: The installation script will prompt you to accept or reject the End User License Agreement. You can view the agreement by entering “v” at the prompt. 3.
Upgrade Procedures mount /dev/dvd /media/dvd cd /media/dvd ./install-fbs 2. When the installation completes, issue the following commands: cd .. eject 3. Remove the optical media disc from the drive and store. 6.6 Upgrading to PCI-to-VME Bridge Version 5.4 If you are using the PCI-to-VME bridge supplied by Concurrent to connect your iHawk system with a VME system, upgrade the software to Version 5.4 at this time by performing the following steps.
Upgrade Procedures 3. If the disc device does not mount automatically, execute the mount command; for example: mount /media/dvd 4. Execute the following commands to install the RedHawk updates included on the disc: cd /media/dvd ./install-updates When the installation is complete, the Main window for Concurrent’s Network Update Utility (NUU) displays, listing product updates that complete your installation of RedHawk.
Upgrade Procedures Wait for on-screen messages to complete. If you are building additional modules out of the kernel source tree, it will be necessary to run ccur-config after upgrading to a new release of RedHawk in order to configure the drivers in the kernel. Follow these steps: 1. Change directory (cd) to /usr/src/redhawk-release-directory. 2. Run the ccur-config(8) tool as follows: ./ccur-config -c Refer to the man page or RedHawk Linux User’s Guide for more details, if needed.
NVIDIA Graphics Configuration 7.0. NVIDIA Graphics Configuration The Unified NVIDIA Linux Display Driver (version 190.42) is included in the RedHawk Linux installation and built automatically for all pre-built and custom RedHawk Linux kernels. The RedHawk installer probes for the type and model of video adapters present in the system, and recommends installing the unified ccur-nvidia-glx rpm when it detects one or more NVIDIA video cards present. See sections 7.1 Supported NVIDIA GPUs and 7.
NVIDIA Graphics Configuration NOTE The NVIDIA driver that is provided with RedHawk installations has been modified to reduce jitter on shielded CPUs in a real-time environment. Therefore, if you choose to download and use a legacy NVIDIA driver directly from the NVIDIA web site, you may observe interference on shielded CPUs during graphics activity. 7.2 Multiple NVIDIA Video Card Considerations Note that you may not use the unified 190.
NVIDIA Graphics Configuration • This mode causes a little extra overhead for X. Xinerama requires entries in xorg.conf to describe the layout of the screens to the X server and the setting of the server flag, “Xinerama” “1”. Xinerama is done by the X server and does not require the use of NVIDIA, but only configurations based on NVIDIA and the nvidia-settings utility are covered in this document. 7.3.
NVIDIA Graphics Configuration The “Twinview” and “metamodes” options must be set in the xorg.conf Screen section. See /usr/share/doc/ccur-nvidia-glx-190/README.txt for a detailed discussion on Twinview. 7.3.5 Twinview-Xinerama This mode enables multiple X Screens to join Twinview Screens as a single Desktop on three or more monitors. The “Twinview” and “metamodes” options must be set in the xorg.conf Screen section for each supported device. This also requires entries in xorg.
NVIDIA Graphics Configuration mv -i /etc/X11/xorg.conf /etc/X11/xorg.conf.orig 4. Run the nvidia-xconfig utility (/usr/bin/nvidia-xconfig): nvidia-xconfig 5. Reboot to runlevel 5. See the nvidia-xconfig(1) man page for details about using nvidia-xconfig. 7.5 Using nvidia-settings The nvidia-settings utility should be used to configure any of the multidisplay configurations described in section 7.3, and is the preferred method for tuning single display settings.
NVIDIA Graphics Configuration 2. To create a new “X Server Display Configuration” select that option from the list on the left as shown below: In the Layout window, we see a graphical depiction of the number of displays detected and configured. Notice that the large box is the primary monitor already configured by nvidia-xconfig. The smaller box to the right (Disabled) is a display that has not yet been configured.
NVIDIA Graphics Configuration Below is what the Layout window would look like if we detected a third monitor: 3. To configure two detected displays as a MultiDesktop, we would select the second monitor in the Layout window by clicking on it. We can see the second monitor is selected for configuration by the red outline around the box: 60 RedHawk Linux Version 5.
NVIDIA Graphics Configuration 4. Click on the Configure button below the Layout window and select the “Separate X screen” option, then click OK: 5. If we wanted to enable Xinerama we could do so at this point by selecting the “Enable Xinerama” check box below the Layout window: RedHawk Linux Version 5.
NVIDIA Graphics Configuration 6. To save the configuration to xorg.conf, click on the Save to X Configuration File button near the bottom of the GUI: Then click Save on the Save X Configuration dialog box as shown above. (Always leave the Merge with existing file box checked). 7. After you have saved the new xorg.conf, click on Quit to exit nvidia-settings: 62 RedHawk Linux Version 5.
NVIDIA Graphics Configuration 8. Reboot to runlevel 5. You should now be up on two X screens. You can restart nvidia-settings to further examine or modify your configuration. Below shows an example configuring the Xinerama option: Below shows an example configuring the Twinview option: RedHawk Linux Version 5.
NVIDIA Graphics Configuration Below shows some stages configuring Twinview-Xinerama or Twinview-MultipleDesktop (the difference would be in selecting or not selecting the Xinerama check box): 64 RedHawk Linux Version 5.
NVIDIA Graphics Configuration Note that nvidia-settings will allow you to do much more than covered here. In some configurations that don’t require restarting X, you can apply changes to test them before saving the config. You should examine your /etc/X11/xorg.conf files after creating them. It easier to hand edit for setting some options, but make sure to make incremental backups of your configurations. 7.6 Modified xorg.
NVIDIA Graphics Configuration Section “ServerLayout” Identifier “ccur nvidia glx realtime” Screen 0 “Screen0” InputDevice “Keyboard0” “CoreKeyboard” InputDevice “Mouse0” “CorePointer” EndSection Section “Module” Load Load Load Load Load EndSection “dbe” “extmod” “type1” “freetype” “glx” Section “Extensions” Option EndSection “Composite” “Disable” Section “InputDevice” Identifier “Mouse0” Driver “mouse” EndSection Section “InputDevice” Identifier “Keyboard0” Driver “kbd” EndSection Section “Monitor” Ide
NVIDIA Graphics Configuration Simply stopping and restarting X does not always do the trick. It is best to issue the command(s): init 1; init 5 or reboot See the X server actions logged in /var/log/Xorg.0.log and Xorg.0.log.old. Normally, X will respond to errors at start up time by telling you there is a problem and offer to show you the log, then create a fresh configuration. A fresh configuration looks very much like the configuration created by the installer. If you are unable to create a working xorg.
NVIDIA Graphics Configuration • vesa – The generic fall back low performance driver which should work for all VGA adapters. NVIDIA has a number of generations of graphics cards which cannot all use the same “nvidia” driver version. Not even the generic “nv” driver in the Linux kernel works on all NVIDIA cards. The “nvidia” driver will actually disable an nvidia controller or fail to load if it is the wrong version for that card.
Additional Information 8.0. Additional Information This section contains helpful information about issues that may be applicable at your site. 8.1 Installation/Configuration Issues 8.1.1 File System Backup Recommendations All file systems should be archived or preserved prior to commencing a reinstallation. This can be accomplished using normal backup methods. Concurrent recommends obtaining a new disk while keeping the original disk to ensure minimal data loss.
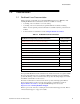
Additional Information 8.1.2 File System Swap Size Guidelines Table 7-2 supplies the recommended swap partition sizes for various sizes of main memory. The swap partition size is based on the size of the system’s main memory plus an additional 5 percent. This swap space allocation should be adequate to accommodate system crash dumps.
Additional Information It is possible to recover from these situations by using “linux rescue”. “Linux rescue” is a boot option on every RHEL 5.1, 5.2 and 5.4 installation media. If you cannot boot after the installation or upgrade, perform the following steps. 1. Boot either the RHEL 5.1, 5.2 or 5.4 installation disc. 2. At the prompt, type linux rescue or press F5 (F2 for more options). 3.
Additional Information Normally, you must ensure that the grub entries contain the correct root LABEL or root partition information along with the correct disk order. For example, note the differences in “hd0” and “hd1” and “sda2” and “sdb2” below: title RedHawk Linux 5.1.2-20080916 (Trace=Yes, Debug=No) root (hd0,0) kernel /vmlinuz-2.6.23.17-RedHawk-5.1.2-trace ro root=/dev/sda2 title RedHawk Linux 5.4-20091211 (Trace=Yes, Debug=No) root (hd1,0) kernel /vmlinuz-2.6.31.6-RedHawk-5.
Additional Information b. Select the keyboard layout. The default is “US”. Select [OK] and press Enter to continue. c. Configure the network device used for the VNC connection to the client. A list of all the network devices seen by the installation kernel displays. The network settings you choose at this point are for establishing the VNC connection. You will be able to change the network configuration from the VNC client at a later point in the installation process.
Additional Information 7. Establish the VNC connection to your VNC server by entering the IPaddress:screen in the VNC Viewer: Connection Details dialog box. 8. Select OK and press Enter to continue. At this point, you are able to perform a graphical installation remotely. 9. Continue with the graphical installation process as described in section 5.1.1 steps 6 - 21, beginning on page 15. After completing step 21 on page page 26, perform step 10 below. 10.
Additional Information Set Security Level: Disabled Set SELinux: Disabled Tab to [OK] and press Enter. 12. From the Set Up Agent main menu, tab to [Exit] and press Enter. After exiting the Set Up Agent, you should see [ OK ] returned by the firstboot service. 13. Edit /etc/inittab and change the first line: from: id:3:initdefault: to: id:5:initdefault: 14. Reboot the system and continue with section 5.1.2 on page 33. 8.1.
Additional Information the system BIOS. The setting in the BIOS will supersede any configuration of this feature in the kernel. Therefore, if hyper-threading is turned off in the BIOS, it will not be available on your system even if it is configured in the kernel. If your system is not behaving as expected in regards to hyper-threading based on the kernel configuration, check the BIOS setting and modify it as needed. Refer to your hardware documentation to determine which BIOS setting is involved.
Known Issues 9.0. Known Issues Special consideration should be given to the following areas. BIOS “Console Redirection” The “Console Redirection” BIOS feature, when enabled, has been observed to interfere with the proper operation of the integrated VGA video and the XFree86 X server with some iHawk platforms, such as the Dell PowerEdgeTM 6650 (iHawk Model HQ665). NMI Button Using the NMI button on the processor enters kdb on the console when configured.
Known Issues irqbalance The irqbalance feature is disabled on RedHawk Linux. This Red Hat feature is meant to distribute interrupts equally across CPUs. It does not honor the IRQ affinity masks set up in /proc/irq/irq#/smp_affinity and therefore will cause interrupts to be routed to shielded CPUs.
Known Issues Pings to Multicast Addresses Disabled by Default In RedHawk 4.1, a kernel.org change was imported that modified the default setting for the sysctl flag that allows pinging to a multicast address. Where previously it was set to enable broadcast and multicast ICMP echo (pings) and timestamp requests, it was changed to disable that functionality.
Known Issues Configure Quad Port Ethernet If your system has a quad port Ethernet, you may need to edit /etc/modprobe.conf and configure the ports to the appropriate driver. The example below assigns the quad port to eth0 through eth3 and uses the Intel e1000 module (Gigabit Network driver). For readability, convention has these lines inserted at the top of /etc/modprobe.conf.
Known Issues Desktop wallpaper and or GNOME panels do not appear or when one of the following errors displays: An error occurred while loading or saving configuration information for gnome-settings-daemon. Some of your configuration settings may not work properly. or GConf error: Failed to contact configuration server; some possible causes are that you need to enable TCP/IP networking for ORBit, or you have stale NFS locks due to a system crash. See http://www.gnome.org/projects/gconf/ for information.
Known Issues • If you notice that no panels are running on the desktop, usually accompanied by the following error, a reboot is required. This sometimes occurs after changing runlevels. Click OK then reboot the system. Crash Dump Support On RedHawk systems, the grub kernel option percpu_alloc=4k should not be used in combination with the crash(1)/kdump(8) support. Also, as was the case in RedHawk 5.2, the crash(1) mach-c command only displays the first CPU information properly.
Software Updates and Support 10.0. Software Updates and Support 10.1 Direct Software Support Software support is available from a central source. If you need assistance or information about your system, please contact the Concurrent Software Support Center at our toll free number 1-800-245-6453. For calls outside the continental United States, the number is 1-954-283-1822. The Software Support Center operates Monday through Friday from 8 a.m. to 5 p.m., Eastern Standard Time.
Software Updates and Support 10.2.2 Installing Manually Downloaded RPMs You can browse Concurrent’s software repositories to locate updated RPMs and download them for manual installation. Access the RedHawk Updates web site (http://redhawk.ccur.com) by clicking on the “Concurrent Software Portal” icon on the desktop. Accessing this web site displays the following screen: 84 RedHawk Linux Version 5.
Software Updates and Support Clicking on the Browse Repositories link takes you to an authentication page. Enter your redhawk.ccur.com Login ID and Password and click the Browse button. Select the products of interest and architecture from the following pages to see the list of RPMs in the product software repository. To locate the latest RPMs in the repository, click on the Last modified column header to sort by date. You may need to click twice to set the sort order to newest-to-oldest.
Software Updates and Support 2. Change directory to the location of the updates and issue the following command: rpm -Uvh *.rpm The time it takes to install will vary depending on the number of updates being installed. 3. When complete, exit single-user mode (Ctrl-D).