Installation guide
Manuals
Brands
Red Hat Manuals
Other
CLUSTER SUITE FOR ENTERPRISE LINUX 5.2
11
12
13
14
15
16
17
18
19
20
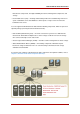
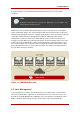
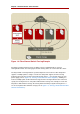
Figure 1.3. Power Fencing Example
Fencing
7
1
...
...
15
16
17
18
19
...
...
76