
Installation guide
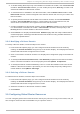

You can continue to add fencing methods as needed. You can rearrange the order of fencing
methods that will be used for this node by clicking on Mo ve Up and Mo ve Do wn .
3.7.3. Configuring a Node wit h Redundant Power
If your cluster is configured with redundant power supplies for your nodes, you must be sure to
configure fencing so that your nodes fully shut down when they need to be fenced. If you configure
each power supply as a separate fence method, each power supply will be fenced separately; the
second power supply will allow the system to continue running when the first power supply is fenced
and the system will not be fenced at all. To configure a system with dual power supplies, you must
configure your fence devices so that both power supplies are shut off and the system is taken
completely down. When configuring your system using Co n g a, this requires that you configure two
instances within a single fencing method.
To configure fencing for a node with dual power supplies, follow the steps in this section.
1. Before you can configure fencing for a node with redundant power, you must configure each
of the power switches as a fence device for the cluster. For information on configuring fence
devices, see Section 3.6, “ Configuring Fence Devices” .
2. From the cluster-specific page, click on No d es along the top of the cluster display. This
displays the nodes that constitute the cluster. This is also the default page that appears when
you click on the cluster name beneath Man ag e C lu st ers from the menu on the left side of
the lu ci Ho meb ase page.
3. Click on a node name. Clicking a link for a node causes a page to be displayed for that link
showing how that node is configured.
4. On the node-specific page, click Ad d Fence Metho d .
5. Enter a name for the fencing method that you are configuring for this node.
6. Click Submi t. This displays the node-specific screen that now displays the method you have
just added under Fen ce D evices.
7. Configure the first power supply as a fence instance for this method by clicking Ad d Fence
Instance. This displays a drop-down menu from which you can select one of the power
fencing devices you have previously configured, as described in Section 3.6.1, “Creating a
Fence Device” .
8. Select one of the power fence devices for this method and enter the appropriate parameters
for this device.
9. Click Submi t. This returns you to the node-specific screen with the fence method and fence
instance displayed.
10. Under the same fence method for which you have configured the first power fencing device,
click Ad d Fence Instance. This displays a drop-down menu from which you can select
the second power fencing devices you have previously configured, as described in
Section 3.6.1, “Creating a Fence Device” .
11. Select the second of the power fence devices for this method and enter the appropriate
parameters for this device.
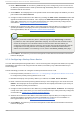
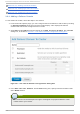
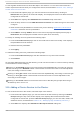
12. Click Submi t. This returns you to the node-specific screen with the fence methods and fence
instances displayed, showing that each device will power the system off in sequence and
power the system on in sequence. This is shown in Figure 3.6, “ Dual-Power Fencing
Configuration” .
Chapt er 3. Configuring Red Hat Hig h Availabilit y Add- O n Wit h Conga
51