
Installation guide


information on deleting a node from an existing cluster that is currently in operation, see
Section 4.3.4, “ D eleting a Member from a Cluster”.
Warning
Removing a cluster node from the cluster is a destructive operation that cannot be
undone.
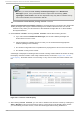
3.5. Global Clust er Propert ies
When you select a cluster to configure, a cluster-specific page is displayed. The page provides an
interface for configuring cluster-wide properties. You can configure cluster-wide properties by
clicking on Co n f ig u re along the top of the cluster display. This yields a tabbed interface which
provides the following tabs: G en eral, Fen ce D aemo n , Net wo rk, Red u n d an t Rin g , Q Disk and
Log g in g . To configure the parameters in those tabs, follow the steps in the following sections. If you
do not need to configure parameters in a tab, skip the section for that tab.
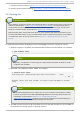
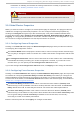
3.5.1. Configuring General Propert ies
Clicking on the G en eral tab displays the G en eral Pro p ert ies page, which provides an interface
for modifying the configuration version.
The Clu st er Name text box displays the cluster name; it does not accept a cluster name change.
The only way to change the name of a cluster is to create a new cluster configuration with the new
name.
The Co n f ig u rat io n Versio n value is set to 1 at the time of cluster creation and is automatically
incremented each time you modify your cluster configuration. However, if you need to set it to
another value, you can specify it at the Co n f ig u rat io n Versio n text box.
If you have changed the Co n f ig u rat io n Versio n value, click Apply for this change to take effect.
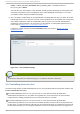
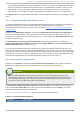
3.5.2. Configuring Fence Daemon Propert ies
Clicking on the Fen ce Daemon tab displays the Fen ce Daemon Pro p ert ies page, which provides
an interface for configuring Po st Fail D elay and Po st Jo in Delay. The values you configure for
these parameters are general fencing properties for the cluster. To configure specific fence devices
for the nodes of the cluster, use the Fen ce Devices menu item of the cluster display, as described in
Section 3.6, “ Configuring Fence Devices” .
The Po st Fail Delay parameter is the number of seconds the fence daemon (fenced ) waits
before fencing a node (a member of the fence domain) after the node has failed. The Po st Fail
Delay default value is 0 . Its value may be varied to suit cluster and network performance.
The Po st Jo in Delay parameter is the number of seconds the fence daemon (fenced ) waits
before fencing a node after the node joins the fence domain. lu ci sets the Po st Jo in D elay value
to 6 . A typical setting for Po st Jo in D elay is between 20 and 30 seconds, but can vary
according to cluster and network performance.
Enter the values required and click Apply for changes to take effect.
Chapt er 3. Configuring Red Hat Hig h Availabilit y Add- O n Wit h Conga
4 3