
Installation guide
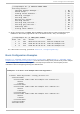
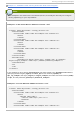
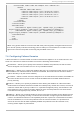

[root@ example-01 ~]# servi ce cman start
Starting cluster:
Checking Network Manager... [ OK ]
Global setup... [ OK ]
Loading kernel modules... [ OK ]
Mounting configfs... [ OK ]
Starting cman... [ OK ]
Waiting for quorum... [ OK ]
Starting fenced... [ OK ]
Starting dlm_controld... [ OK ]
Starting gfs_controld... [ OK ]
Unfencing self... [ OK ]
Joining fence domain... [ OK ]
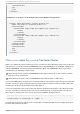
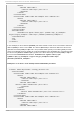
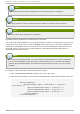
9. At any cluster node, run cman_too l no d es to verify that the nodes are functioning as
members in the cluster (signified as "M" in the status column, " Sts"). For example:
[root@ example-01 ~]# cman_to o l no d es
Node Sts Inc Joined Name
1 M 548 2010-09-28 10:52:21 node-01.example.com
2 M 548 2010-09-28 10:52:21 node-02.example.com
3 M 544 2010-09-28 10:52:21 node-03.example.com
10. If the cluster is running, proceed to Section 7.3, “ Configuring Fencing” .
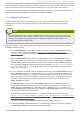
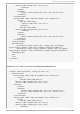
Basic Configuration Examples
Example 7.1, “cl uster. co nf Sample: Basic Configuration” and Example 7.2, “ cl uster. co nf
Sample: Basic Two-Node Configuration” (for a two-node cluster) each provide a very basic sample
cluster configuration file as a starting point. Subsequent procedures in this chapter provide
information about configuring fencing and HA services.
Examp le 7.1. cl uster.co nf Sample: Basic Co n f ig u rat io n
<cluster name="mycluster" config_version="2">
<clusternodes>
<clusternode name="node-01.example.com" nodeid="1">
<fence>
</fence>
</clusternode>
<clusternode name="node-02.example.com" nodeid="2">
<fence>
</fence>
</clusternode>
<clusternode name="node-03.example.com" nodeid="3">
<fence>
</fence>
</clusternode>
</clusternodes>
<fencedevices>
Basic Co nfigurat ion Examples
107