
Specifications

Copyright © 2015. Tenable Network Security, Inc. All rights reserved. Tenable Network Security and Nessus are registered trademarks of Tenable Network Security, Inc.
20
# /opt/nessus/sbin/nessuscli fetch --register <activation code>
6. Reindex Nessus plugins. This may take up to 15-20 minutes, depending on your system.
# /opt/nessus/sbin/nessus-service -R
7. Once Nessus completes the reindexing process, restart the Nessus service:
# /sbin/service nessusd start
8. Log in to your Nessus scanner using the Nessus UI at https://yoursystem:8834.
9. Once you confirm your new system is working correctly and all the files are migrated, go through the removal
process on the original system listed in the Mac OS X section of this document.
For backing up and/or restoring a complete Nessus installation, please contact Tenable Support if you have any
questions. This will help to ensure there are no deviations from a normal installation that may prevent critical data from
being maintained.
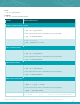
Windows
Upgrading
Upgrading from 5.x to 6 is straightforward and does not require any special considerations. Instructions are below.
Upgrading from 5.x
Download the latest version of Nessus from the Nessus download page or through the Tenable Support Portal. Confirm
the integrity of the installation package by comparing the download MD5 checksum with the one listed in the product
release notes.
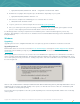
When upgrading Nessus from a 5.x version to the Nessus 6 distribution, the upgrade process will ask if the user wants to
delete everything in the Nessus directory. Choosing this option (by selecting “Yes”) will mimic an uninstall process. If you
choose this option, previously created users, existing scan policies, and scan results will be removed, and the scanner will
become unregistered.
Click on “Yes” to allow Nessus to attempt to delete the entire Nessus folder along with any manually added files or “No” to
maintain the Nessus folder along with existing scans, reports, etc. After the new version of Nessus is installed, they will
still be available for viewing and exporting.
The user may also be prompted to reboot the system depending on the version being installed, and the version currently
on the system: