
Specifications


Finishing with Smoke or Flame
Create a new project
Create a new project with settings that match the
exact frame size of your DPX sequences.
HD projects use the usual HD formats, but for film
use these values:
Aspect ratio: 2 or 1.77778, depending if your •
frame size was 2:1 or 16:9
Bit Depth: 10-bit•
Field order: Progressive•
Graphics Processing: 16-bit FP Graphics•
Width/Height: frame size of RED footage (see table)•
Import the DPX sequences
In the Library, create a new reel to import •
your footage, and select it.
Click Import Image.•
Set the image format to DPX.•
Under Clip Media, set your Soft-Import Full •
Res option on or o.
Under Clip Metadata, select Tape From File •
Header and File Header Timecode.
Navigate to the root folder containing the •
DPX sequence folders.
Turn on the Scan Subdirectories option; you •
should see your DPX sequences in the Files
browser.
Select all of your sequences and click Load. •
Clips are created from the DPX files in the selected •
reel.
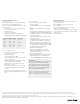
Frame size Width Height Aspect ratio
4K 16:9 4096 2304 1.777778
4K 2:1 4096 2048 2
3K 16:9 3072 1728 1.777778
3K 2:1 3072 1536 2
2K 16:9 2048 1152 1.777778
2K 2:1 2048 1024 2
Import the XML file
Set the edit list import option to XML.•
Click Import XML.•
Uncheck Link with video files and Link with audio •
files.
Navigate to your FCP XML file, select it and click •
Load.
The recapture window will open, but you need not •
change any setting here. Just click EXIT Recapture.
The XML has now been converted to a clip named •
like your FCP sequence.
Select the clip and drag it to the Reel containing •
your DPX sequences.
You will now need to Consolidate and Reformat •
the clip before you can Relink it to your media.
With the clip still selected, go to the Tools section.•
In the Consolidate section, set Consolidate to All •
Tracks and adjust the Handles setting according to
the handle amount you set in Crimson.
Click Consolidate and confirm.•
Next, in the Unlink/Relink section, select •
Reformat and carefully chose the settings that
match your DPX sequences.
Click Reformat and confirm.•
Then, in the Relink section, click Relink From Reel. •
Your DPX sequences are now relinked to the •
imported FCP XML. You can now finish the project.
About Audio
Audio from the RED ONE™ camera is integrated
into the R3D™ file. The QuickTime proxies
generated by the camera read the audio from
the original file. When converting footage with
RED tools, these applications will also copy the
audio to stand-alone QuickTime files.
To import an audio edit from FCP to Smoke,
Flame, or Lustre, you must mix down the
audio to a 2-track audio file before importing.
RED Digital Cinema, RED, RED ONE™, REDCODE™, R3D™, RED RAW™, Mysterium
®
, Scarlet, REDFLASH™, RED DRIVE™, REDCINE™, RED ALERT!™, REDline™, REDspace™, and REDrushes™ are
trademarks of RED.COM, Inc./RED Digital Cinema Camera Company.
Finishing with Lustre
Put your EDLs (exported from FCP) in your Lustre
project’s scene folder.
Import the DPX sequences to the Shot Bin.
Import the EDLs.
To select the proper tape name for assembly,
enable the Use DPX Reel option.
Under Use options, enable “TC”. This allows Lustre
to use the timecode in the DPX file header instead
of file numbers.
Assemble the EDL.
Autodesk is a registered trademark or trademark of Autodesk, Inc., and/or its subsidiaries and/or aliates in the USA and/or other countries. All other brand names, product names, or
trademarks belong to their respective holders. Autodesk reserves the right to alter product oerings and specifications at any time without notice, and is not responsible for typographical or
graphical errors that may appear in this document. © 2008 Autodesk, Inc. All rights reserved.
5