
Specifications


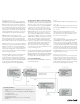

Exporting DPX Sequences Using Crimson
Workflow
Use the Crimson Workflow application to convert
R3D™ media to DPX sequences.
Open the Crimson application. At the top of the interface,
click Choose to open your XML file. Then, carefully follow
the steps for each of the following sections.
Match section
Click the + button to select the root folder where
your R3D™ files reside.
Click the Match button to reconnect your original
media to your edits. In the bottom table, make sure
all of your edits are matched to the proper R3D™ file;
they will be marked with a Found or Multi status.
Frame section
Select your output frame size. For video and HD
workflows, select the proper standard or high definition
frame size (such as HD1080p). For film workflows,
select a 2K or 4K output size (such as 2K 2:1 or 4K 2:1).
Make sure that you set the appropriate settings
under Scaling Operation for your output size.
For Resample, select a resampling filter (such as
Mitchell or Lanczos).
Color section
Set all Gamma and Color Space settings. See
Setting Color Space below.
REDline™ section
Set the Rendering Output Path for your DPX files
(making sure that you choose a folder on your
storage that is accessible to Smoke, Flame, or Lustre).
If required, set the appropriate handles.
Set File Specification to: EVENT#Z/#F#&.E (this will
render a DPX sequence, named according to the R3D™
file and a frame number, in a separate folder per event).
Under Render Settings, for Quality select Full
Debayer and for Output Format select DPX.
Make sure that Use TOD/TC is selected.
Click the Render with REDLine button. This will
start the conversion process.
For more information about Crimson, see Appendix B.
For more information on REDline™ and other RED
applications, see Appendix A.
4
Video Deliverable
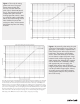
If your primary deliverable is video, then set Gamma to Rec709 and Color Space to REDspace™.
Setting the Color Space to REDspace™ rather than Rec709 seems counter-intuitive; however in our
tests, setting it to Rec709 gave results that were far too saturated. If the scenes were lit for ISO 320,
you would find that converted images look dark. This does not necessarily mean that the images were
underexposed. It does mean that you have to begin your grading session with an overall gamma boost.
Use the Brightness parameter to brighten everything during the conversion process. A value of about
2.5 in Crimson is a good starting point. (The Brightness control in REDCINE™ is 10x more sensitive, so
use a value of about 25.)
Another important point about the Rec709 Gamma setting is that the converted images contain all the
highlight information that was captured by the camera. One might assume that using one of the log Gamma
settings would export images with more highlight information, but this does not seem to be the case.
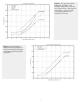
Film Deliverable
If your primary deliverable is film, we assume you will be using a print film simulation D-look up
table (LUT) (such as from Autodesk
®
Lustre
®
Color Management) for grading. The goal is to convert
your images into something resembling a Cineon
®
-style scan from color negative film. Because the
characteristics of the RED ONE™ are so dierent from film negative, and because of the limited
color processing flexibility of Crimson, this is not entirely possible.
To get the tone scale approximately correct, set Gamma to PDLog985. This results in images
that have the correct contrast but look about two stops over-exposed. Unless a shot is very
underexposed, set the Exposure parameter to -2.0. This puts a normally exposed gray at a 10-bit
value of about 470 (as per convention).
Set the Color Space parameter to either CameraRGB or REDspace™. Colors will seem washed out
compared to film capture. To correct this, try using the Saturation parameter to boost saturation.
A fair amount is needed, but going above 0.2 can start to cause clipping artifacts in saturated
colors. Crimson can display the individual RGB channels. This is a good way of detecting if too
much saturation boost has clamped detail in certain colors. (The Saturation control in REDline™,
REDALERT!, and Crimson is zero-based rather than one-based. For REDCINE™, use 1.2.)
Setting Color Space
After you have loaded your clips, Crimson Workflow
displays the various color settings that were stored
as metadata in your R3D™ files. These will vary
depending on how the camera was configured at the
time of shooting. The settings for each clip will control
the rendering of the files from camera RAW to some
other color space. For example, if you set Kelvin to
3200, Crimson will white balance the images so that
gray objects lit with tungsten light (color temperature
of 3200K) will have roughly equal red, green, and blue
pixel values. Likewise, if you set ISO (speed/sensitivity)
higher than 320, Crimson will boost the exposure of
the images (make them lighter).
You can override the color settings for the currently
selected clip. However, for settings like ISO and Kelvin,
if they were correctly configured during the shoot, you
shouldn’t need to override them. Nevertheless, you
may want to override the Gamma and Color Space
settings that will configure what color space you
convert your images to.
The best values to use will depend on a variety
of factors. Here are some pointers to get you
started.
Lighting for Video
If the director of photography lit the scenes
according to a video style of working, then
you should leave Gamma and Color Space as
they are so that converted images resemble
what was seen on the HD monitor on set.
However, be aware that if using REDspace™
gamma, you may have limited flexibility in color
grading because the highlights will be somewhat
compressed. For more information on RED Color
Processing, see Appendix D.
Lighting for Film
If the DP lit the scenes according to a film style
of working (relying on a light meter rather than
a video monitor), then there are several options,
depending on whether your primary deliverable
is film or video.