
Specifications


Working In Final Cut Pro
Import QuickTime proxies into Final Cut Pro
There are several methods of editing your
content in FCP. One reliable method is to use the
QuickTime proxies generated by the camera. These
proxies contain the synced audio from the shoot.
Make sure that you do not modify your proxy
filenames or the R3D™ filenames. Instead, use the
various comment columns to identify your clips.
Import the proxies directly into FCP, either by
drag-and-dropping them into a bin, or by using the
File > Import Option.
Selecting a proxy resolution before import
depends on the speed of your editing system. The
medium-resolution proxies (ending in _M.mov)
work best under most circumstances.
Edit
When inserting a proxy clip into a new sequence,
FCP will prompt you to change the resolution of
the sequence to match that of the footage.
Click Yes, then, in the RT menu, select a low quality to
avoid as much playback stutter as possible.
While real-time debayering is very processor-intensive,
it is still a simple way to edit footage with synchronized
sound from the original camera recording.
For another editorial approach in Final Cut Pro,
see Appendix C.
A Flame or Smoke workflow involves exporting
only an XML file. For a Lustre workflow, you also
need to export one or more EDLs, so limit your
edit to one video track. If you must edit using
several tracks, you will have to make as many
duplicates of your sequence as you have video
tracks and remove any additional video from the
duplicates. You will end up with several EDL files,
one per video track.
3
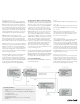
Export an XML File for Flame, Smoke, or Lustre
Once you are done editing, export an XML of
the final sequence.
Select the sequence in the browser.
Choose File > Export > XML…
Select Apple XML Interchange Format, version 2.
Do not select Include Master Clips •
Outside Selection
Check Save project with latest clip •
metadata (recommended)
This XML file points to the QuickTime proxies
that you used for your oine editing (in this
case, movies that are not at the full resolution
the RED camera is capable of delivering).
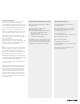
Export EDL Files for Lustre
Pare down your FCP sequence to make it
more EDL-friendly.
Make as many duplicates of it as you have
tracks, and prepare video-only sequences,
carefully naming each one.
For each FCP sequence:
Select the sequence to export in the Browser.
Choose File > Export > EDL…
Type in a title for the EDL.
Select CMX 3600 as a format.
In the Audio Mapping box, set the four audio
tracks to None.
Repeat these steps for each video track’s
corresponding sequence.