
Technical data


Version 3.0
955-0002_V3.0, REV-A ©2011-2012 RED.COM INC.
213
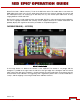
CONNECTING CAMERAS
1. While still powered up, connect both cameras together using a Master/Slave GIG-E Cable P/N 790-
0163 connected between the GIG-E connectors on the rear of the camera body.
2. Power down both cameras, then power back up. When properly connected, LAN will illuminate
Green on the UI.
3. Connect a SYNC cable P/N 790-0154 to each camera and connect as desired to your 3
rd
party
device.
• Yellow connector is for Timecode.
• Green connector is for Genlock.
• White connector is multi-purpose (example: for remote trigger for start/stop recording).
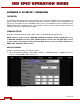
4. Go to SETTINGS > SETUP > GPIO/SYNC > SYNC MODE and select GENLOCK.
5. Adjust camera project frame rate to match the attached 3
rd
party device.
6. When properly connected and synchronized, TC, GEN and SYNC will illuminate Green on the UI.
OPERATION
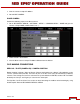
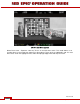
CHANGING SETTINGS
When changes are made to the Master camera settings, the Slave camera setting will also change, but
not in real-time. For example, when you change the Frame Rate on the Master camera, you will not see
the change on the Slave camera until you set the Master camera at the new Frame Rate.