
Assembly Instructions


2
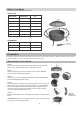
Before You Begin
PARTS LIST
HARDWARE:
PART NAME REFERENCE QTY
M6 Nut
M6x12 Bolt
M6x40 Bolt
AA
BB
CC
5 pieces
12 pieces
8 pieces
Screen Handle
Mesh Fire Screen
Fire Bowl
Copper Rail
Supporter
Leg
Fire Tool
A
B
C
D
E
F
G
1 piece
1 piece
1 piece
4 pieces
4 pieces
4 pieces
1 piece
Check to make sure you have the following:
Remove all parts from packing and check to make sure you have all parts described in “Before You Begin” section above.
Spread out parts on a soft, level surface to avoid scratching parts.
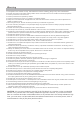
STEP 1 :
Insert Screen Handle (A) into hole at top of Mesh Screen (B) and
tighten with 1 piece M6 Nut (AA) on underside of screen.
STEP 2:
Attach Supporter (E) to the Fire Bowl (C) with 4 pieces M6 Nuts
(AA) and 4 pieces M6x12 Bolts (BB).
STEP 3:
Attach Leg (F) to the Fire Bowl (C) with 8 pieces M6x12 Bolts (BB).
DO NOT TIGHTEN BOLTS FULLY.
STEP 4:
Insert the Copper Rail (D) into the opening at top of the Leg (F), and
align the
hole in the Copper Rail with the hole in Leg. Insert M6x40
Bolt (CC) through both holes and loosely tighten. Repeat with the
remaining 3 pieces of the Copper Rail and Leg. Tighten all bolts
once you have assembled all 4 pieces.
STEP 5:
Tighten all hardware. Place assembled Mesh Screen on assembled
firepit.
CAUTION: NEVER use your hands to open or close the screen when
hot, use the Fire Tool (G) provided.
Preparation
Assembly Instructions
A
B
D
C
E
F
G
A
B AA
C
E
C
D
F
HOLES TO
ALIGN WITH
HOLES IN LEG
F
AA
BB
BB
CC