W RAN 1 TY AR 1YEAR Happy? Please leave us a review! You can make others happy too!
IMPORTANT, RETAIN FOR FUTURE REFERENCE: READ CAREFULLY. Safety For domestic use only. Don't tighten all the bolts before the product is fully assembled. It would be useful to ask someone to help you assemble the product. Periodic structural checks of this product should be undertaken, do not use if you have any doubts about its Do not stand on the seat and table. Do not sit on the armrest and table. Do not let children play with this product. Maximum load per seat: 250 lbs.
Tips for Cushions In order to compress the package, we put the cushions in the gap of some parts. So there may be crinkle on the fabric. Don’t worry. Just flap every corner of the cushion evenly and it will get back into its original shape soon.
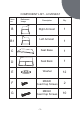
COMPONENT LIST - LOVESEAT Item no. Reference Image Description Qty.
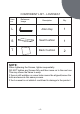
COMPONENT LIST - LOVESEAT Item no. Reference Image Description Qty. L Allen Key 1 S Seat Cushion 1 T Back Cushion 2 NOTE: When tightening the Screws, tighten sequentially. DO NOT tighten any Screws fully and then move on to the next one. This may cause the frame to warp. If there is still wobbles or screw holes cannot be aligned,loosen the bolts and execute this same process. If the Loveseat is not stable it could lead to damage to the product.
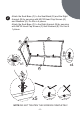
1 Attach the Seat Back (D) to the Right Armrest (B) by securing with M6*40 Head Cap Screws (G) and Washers (E). Do this in 2 places. D E G B x1 G E x1 x2 NOTE:DO NOT TIGHTEN THE SCREWS COMPLETELY.
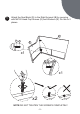
2 Attach the Seat Base (C) to the Seat Back (D) and the Right Armrest (B) by securing with M6*40 Head Cap Screws (G) and Washers (E). Do this in 4 places. Attach the Seat Base (C) to the Right Armrest (B) by securing with M6*20 Head Cap Screws (F) and Washers (E). Do this in 1 places. C B G E E F x1 D x5 NOTE:DO NOT TIGHTEN THE SCREWS COMPLETELY.
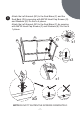
3 Attach the Left Armrest (B1) to the Seat Base (C) and the Seat Back (D) by securing with M6*40 Head Cap Screws (G) and Washers (E). Do this in 4 places. Attach the Left Armrest (B1) to the Seat Base (C) by securing with M6*20 Head Cap Screws (F) and Washers (E). Do this in 1 places. E B C B1 F x1 G E x3 D E G x1 x5 NOTE:DO NOT TIGHTEN THE SCREWS COMPLETELY.
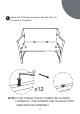
4 Tighten all 12 Screws into place with Allen Key (L). Loveseat is completed. L x12 NOTE:IF ANY SCREW HOLES CANNOT BE ALIGNED, LOOSEN ALL THE SCREWS AND GO BACK STEP 1 AND RESTART ASSEMBLY.
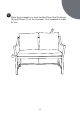
5 Place the Loveseat on a level surface.Place Seat Cushions (S) and Pillows (T) on the Loveseat. Your Loveseat is ready for use.
COMPONENT LIST - TABLE Item no. Reference Image Description Qty.
COMPONENT LIST - TABLE Item no. Reference Image Description Qty. G M6X35 Head Cap Screws 14 L Allen Key 1 I Table Cushion 1 NOTE: When tightening the Screws, tighten sequentially. DO NOT tighten any Screws fully and then move on to the next one. This may cause the frame to warp. If there is still wobbles or screw holes cannot be aligned,loosen the bolts and execute this same process. If the Table is not stable it could lead to damage to the product.
1 Attach the Table Base (H) to the Table Leg (M)&(O) by securing with M6*35 Head Cap Screws (G) and Washers (E). Do this in 6 places. E G x6 M H O x6 NOTE:DO NOT TIGHTEN THE SCREWS COMPLETELY.
2 Attach the Table Legs (P) to the Table Leg (M)&(O) by securing with M6*35 Head Cap Screws (G) and Washers (E). Do this in 8 places. E G x8 M P P O x8 NOTE:DO NOT TIGHTEN THE SCREWS COMPLETELY.
3 Attach the Table Top (J) to the Table Leg (M) by securing with M6*20 Head Cap Screws (F) and Washers (E) & Washers (E1). Do this in 2 places. J E1 M P P O x2 NOTE:DO NOT TIGHTEN THE SCREWS COMPLETELY.
4 Tighten all 16 Screws into place with Allen Key (L). Table is completed. L x16 NOTE:IF ANY SCREW HOLES CANNOT BE ALIGNED, LOOSEN ALL THE SCREWS AND GO BACK STEP 1 AND RESTART ASSEMBLY.
5 Place the Table on a level surface and adjust height for balance. Place the Table Cushion (I) on the table. Your Table is ready for use.