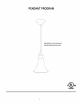
PACKAGE CONTENTS a future. 1 piece b. mounting strap {per-attached fo figure. 1 piece calumniating strap screw (per-attached to mounting strap), 2 pieces d. hardware pack Serengeti ARCH Reassertion SRC eaE BRIAN SE eee rrr GIRT RT smithereens RAPE FAISAL CE Crispy A ANE O RRS ACE PEERS RENEE EI SEY RARER PRS a fixture. 1 piece b. socket ring (per-attached to fuel. 1 piece ©. mounting breastplate fore-attached to fixture], 1 piece d. decorative nut {per-attached to mounting strap/plate), 2 pieces a. shade.
i SAFETY INFORMATION « [3 HOT connect the bare or green insulation firmware ground wire fo the black (HOT) current-carrying wire or the white neutral house wire, Connection of the bare or green fixture ground wire fo the black or white house wires may cause metal parts of the fixture fo cray electrical currents. Under this condition anyone coming in contact with the fixture will receive electrical shock, which could cause serious injury or death.
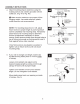
ASSEMBLY INSTRUCTIONS 1. Turn off circuit breakers and wall switch to the fixture supply ine leads. (Fig. 1) Ah DANGER: Failure to disconnect power supply prior to installation may result in serious injury or death. Remove existing figure and disconnect all electrical wiring. (Fig. 2} Unwrap bare wire from the other two wires in the fixture canopy. Remove mounting strap from the fixture by removing mounting strap screws from the edges of the Sure. (Fig. 3A) Save mounting strap screws for later use.
ASSEMBLY INSTRUCTIONS 4. Attach mounting strap to outlet box using the existing screws and washers provided with the outlet box. (Fig. 4A or Fig. 48) Ah Wake sure the outlet box can support 35 tbs. hanging weight. Use meal outlet box; plastic outlet boxes are not recommended. MOTE: For mounting strap shows in 48, adjust fixture screws to proper length by screwing fixture sowers completely into mounting strap.
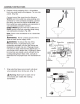
ASSEMBLY INSTRUCTIONS 8. Prepare wire by stripping 3/4 in. of insulation from wire ends using wire strippers. Tie wire into a knot. (Fig. BA) Connect one of the wires from the fixture fo WHITE wire from cutie! box using existing wire connector or wire connector provided.
ASSEMBLY INSTRUCTIONS 8. 10. Carefully arrange excess wiring and wire connectors within canopy. Align holes in edge of fixture canopy with screw holes at ends of mounting strap. Beebread fixture with mounting strap screws that were removed in Step JA on page 4. (Fig. 84} JS" — Align holes in fixture canopy with fixture screws on mounting strap and push up. Secure figure to ceiling with the two decorative noels that were removed in Step 3B on page 4. (Fig. 68) install bub. (Fig.
CARE AND MAINTENANCE Shut off main power supply. Wipe with soft cloth or use window cleaner. Do not use an abrasive cleaner. TROUBLESHOOTING b Warning: Before beginning work, shut off the power supply to avoid electrical shock. aims t=l passe le Belize Es senna Bulb will not light. 1. Bulb is boomed oul. 1. Replace light bulb, 2. Power is OFF. 2. Make sure power supply is ON. A. Faulty connection. 3. Check wiring and all connections. Fuse blows out or 1. Crossed wires. 1. Check wiring.
LIGHTING LIMITED WARRANTY We warrant all of is Products to be free from defects In material and workmanship, subject to certain conditions and exclusions, for the period of one (1) year from the date the Product was shipped to the original end use purchaser. The Distributor will, al fis discretion, repair, replace or make appropriate adjustment where inspection discloses any defects timeserving in normal usage within the applicable me period above, subject to the billowing conditions and exclusions.