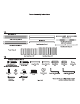
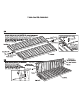
Frame Assembly Instructions 1A Parts in Box LEER) 3 Advance Arms Back Desk Long Rails (EEE) 3 Seat Deck End Caps « 2 with the Feet attached Les | Seat Deck Long Rails x 2 Parts in Box 2: Foot Connector Baez 1 ETE BET Back Deck End Caps x2 Seat Deck Slats x 12* Back Deck Slats x 13% 1B Hardware {received in Box 1) Fm oom Bolts (60mm) x 14 Bolts (30mm) x 50% Long Clevis Pins Short Clevis Pins Long Sleeve Short Leave Locking Pins For the Advance Ams, For the Slats End Caps & Foot Connector Bar Barrel Nuts Wash
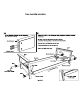
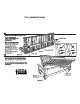
Frame Assembly Instructions 2A Fit the Wooden Dowses into the Stretchers {From Arm Bax Hardware) End of Stretcher Alien Key Leave Bolts LOOSE! Barrel Nuts Wooden Dowels 2B Attach the Arms® to the Stretchers using separate hardware received in arm box. Be patient, it can be tricky to start the boils in the nuts # screwdriver will help you line up the Barrel Nut with the Belt. Drive the Ohs in until they just catch the Nuts, tis important they these bolts are left loosed Arm "Your arm style may vary.
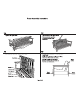
Frame Assembly Instructions 3A Attach the End Caps to the Back Deck. Using R-1, R-2, L-1, snd L-2 stickers #5 a guide, attach the back deck end caps to the back deck long rails. Attach the dowels to the back deck end cap rails and then using 60 mm bolts and barre nuts, bolt the end cap to the long rail. Repeat for all four junctions. Be patient, it can be be tricky to start the bolts in the nuts: Wooden Dowels [R-1] holding the basal nut in the cataract position will help fine up the bolts.
Frame Assembly Instructions 4A Attach the End Caps to the Seat Deck. Using R-1, R-2, L-1, snd L-2 stickers 55 8 guide, sties the seat duck a : Me™ end raps to the seat deck long rails. Attach the dowels to RR 40mm Bolt the seat deck and cap rails and then using 40 mm Seat Deck Ny ares Nuts bolts and barrel nuts, bok the end cap mars! Pu 10 the long rail. Repeat for all x IH am four junctions.
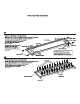
Frame Assembly Instructions 3A Jun the Seat and Back Deck together. Lay both Sacks out flat on the floor with the stickers facing upwards. The Saar Deck fits inside the Back Deck as shown. Slip the Long Clavicle Pin through the small end of the Plaits then two small sleeves, then through the hol the Back and Seat Sack. Secure with Washer and Locking Pin. Long Clevis Pin X35 Short Sleeves Plastic Runner 5B Fit the Advance Arms to the Back Deck. Rotate the Back Sack upright.
Frame Assembly Instructions 6A Attach the Connector Bar to the Lift the Seat Deck so iris resting on the Back Deck, the feet should be pointing DOWNWARDS. Line up the holes between the Connector Bar and the Feet. Make sure the recess for the bolt is fencing outwards. CAUTION: The metal insert in the foot MUST be facing the Back Deck, Use four Ohs (60 mm and Seat Deck bolt it in place. 4B Back Sack Fit the Seat Back Decks to the Frame.
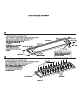
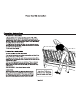
Frame Assembly Instructions 7A 7C Tighten all eight Bolts. Fit the Strap to the Back Deck. [} Only needed for operation on frames utilizing heavy mattresses. 7B 7D Connect the Advance Arms to the Arms. Fit the Wood Buttons to the Arms and Back Deck Washer __ | Advance Arm Long Sleeve Washer 0mm Bolt Finally, when the frame is fully assembled, make sure all tha bolts are secure. Push fit er lightly tap the Wed Buttons x 10 inch the bolt holes on the Arms and Back Sack.
Frame Assembly Instructions Operating Instructions To convert anti a bed position oi ift seat deck up just so it clears the front stretcher. PULL ONLY HORIZONTALLY and as LOW TC THE GROUND as possible until ne longer possible, then lift front of deck vertical and inward toward back TU of frame. At this paint, it will look like the picture. If you lift vertically 4 too quickly, the frame will sim down. Resting the seat deck on your hip, push the seat deck and mattress forward (towards the back deck).