
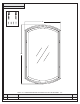
Assembly Instruction

4of5
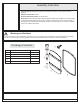
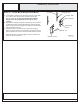
C
Hanger Nail
Mirror Hanger
Adjustment
Screw
Bracket Catch
Mark "B"
Crossbar with
Side Holes
3”
Figure 3
STEP 3 - Locate Mirror Hangers and Mirror
A. Locate Mirror Hangers (A) and align the top center with
3” Locator mark. Secure them to wall surface with
Hanger Nails (B).
B. With Mirror Hangers properly installed, be sure that the
(2) Bracket Catches are approximately equal in length
from the top of Mirror Hangers (A). Adjust overall length
with Adjustment Screws.
C. With the help of another person, pass the Side Holes on
the Crossbar at the back of the Mirror over the Mirror
Hangers (A) so that the Crossbar rests on the inside of
the Bracket Catches.
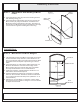
Clean glass with household glass cleaner. Retain this
sheet for future reference.
Please be noted that the Mirror
Hangers are fully adjustable allowing for easy
leveling.
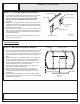
FOR HORIZONTAL
Figure 4
STEP 4 - Mark Points for Mirror Hangers
A. Lift and position where the Mirror will reside on the wall
surface and with a tape measure, mark distance from
floor to the bottom edge of the frame with a pencil. Mark
should be located at a point representing ½ of mirror
width.
B. Place the Mirror on a flat surface with back facing you.
Draw a line from the top quarter of the Hanging Holes
on the Crossbars. Measure the distance from the
bottom edge of the Mirror Frame (E) to the line. This
represents distance “B” in the illustration.
C. With tape measure, add this distance to Mark “A” on
wall surface and mark with pencil.
D. Measure distance between center line of the two
Hanging Holes. Add this ½ distance from Mark “B” on
each side and mark with pencil. (Distance “C” in the
illustration)
E. Measure 3” up from Mark “C” and mark. These marks
are locators for the (2) Mirror Hangers. Check for marks
straightness with level.
"A”
Floor
Surface
½ WIDTH
"B”
BACK
Hanging Hole
"C”
Side Hole
Crossbar
Assembly Instruction