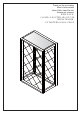
Thank you for purchasing Merci d’avoir acheté Vielen Dank, dass Sie sich Gracias por comprar WINE RACK CASIER À BOUTEILLES DE VIN WEINSTÄNDER ESTANTERÍA PARA VINOS
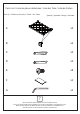
Parts List / Liste de pièces détachées / Liste der Teile / Lista de Partes: Part No. / Référence de pièce / Teilenr. / No.
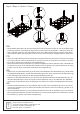
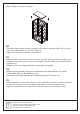
Step 1 / Étape 1 / Schritt 1 / Paso 1 C C D E E E G EN • Insert Bottom Side Tubes (D) onto the brackets nearest to the floor levelers on one of the Wine Rack Frames (A) with the screw holes facing inwards. Insert Screws (E) and tighten with hex wrench (G). • Insert Top Side Tubes (C) onto the brackets of the same Wine Rack Frame (A) with the screw holes facing inwards and the wire strips close to the top of rack. Insert Screws (E) and tighten with hex wrench (G).
Step 2 / Étape 2 / Schritt 2 / Paso 2 C E E E G EN • Insert the Sides Tubes (C & D) that were already attached in step 2 onto the brackets of the other Wine Rack Frame (A) then insert screws (E) and tighten with hex wrench (G). • Note: Make sure the Wine Rack Frames (A) match up so the floor levelers are all on the same side.
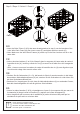
Step 3 / Étape 3 / Schritt 3 / Paso 3 EN • Turn Wine Rack upright, with floor levelers on the ground, and place Glass Top (F) on the wire strip holders that are on Top Side Tubes (C). • Adjust floor levelers as needed on uneven floors. FR • Mettez le casier à bouteilles de vin en position verticale, avec les vérins de calage au sol. Déposez le couvercle en verre (F) sur les supports pour fils situés sur les tubes latéraux supérieurs (C).