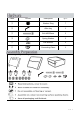
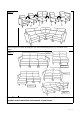
Caution :You must read this before you proceed ARMLESS SOFA Label Picture Description QTY A Seat Frame 1 B Backrest 1 C Back Cushion 1 D Leg 4 1 of 7
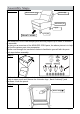
Label Picture Description QTY ① Washer Ring 7 ② Allen key 1 ③ Bolt M8*20mm 2 ④ Spring Washer 2 ⑤ Flat Washer 2 ⑥ Connecting Piece 1 Before Beginning Assembly: 2 of 7
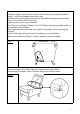
OVERVIEW Back Cushion (C) Backrest(B) Seat Frame (A) Leg (D) Leg (D) FRONT FACING This ARMLESS SOFA has multiple parts and may require up to some 30 minutes to assemble. To give you an overview of the ARMLESS SOFA parts, the above picture is to help you put the various parts into perspective. Please read through the instructions below to familiarise yourself with the parts and steps before assembly. Step 1 A C Position the Seat Frame (A) on its back,as shown.
Install the Legs(D) into the bottom of the Seat Frame (A) by placing a Washer Rings(①) onto the threaded stem of the Legs. And then insert the threaded stem into the threaded mounting position at each Corner of the Bottom Seat Frame (A)). Tighten by turning the Legs clockwise. Note: The use of Washer Rings(①) are OPTIONAL and are especially useful to help alleviate slight wobbles. Some Legs may need more than one Washer Ring whilst some Legs may not need any.
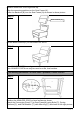
Position ARMLESS SOFA right side up. Align the mounting positions on the Seat Frame (A) . Insert the Backrest (B) into the Seat Frame (A) as shown in above picture. Step 5 Back Cushion (C) Put the Back Cushion(C) on the ARMLESS SOFA. Step 6 Your ARMLESS SOFA is ready for use. Your ARMLESS SOFA can only be used on a flat, level surface. If you already purchased 2 or more than 2 products, Please read on Step 1 Position the ARMLESS SOFA on level surface,as shown.
Step 2 ⑥ ⑥ ⑥ ⑥ Connecting the two sofas by using the pre-fixed Connecting Piece (⑥) as shown in the picture. Step 3 Step 3.1 Step 3.2 Step 3.3 Step 3.4 Step 3.5 Note: This is optional step in case we want to connect all sofas in a set together and to match the environment of your home.
of 7