
Assembly Instructions

rm
SOCKET RING
·r-"
I \
I \
(
\
I
I
I
I
I
I
\
'--sHADE
L __ _i
I \
I \
I
I
I
I
I
I
I
L __ _i
~
.
1---1~---BLACK
WIRE
WHITE WIRE
~-~-------11~
----ouTLET
BOX
GROUND
WIRE----f':l:ll'B
WIRE
CONNECTOR.--~ -,'Ml,.,~+---MOUNTING
STRAP
--=----MOUNTING
SCREW
BALL
NUT
--1+
--t
I \
I
\
I
\
I I
\ I
\ I
\ I
L __ _i
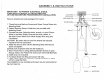
1.
Thread two long Machine Screws and Green Ground Screw into
Mounting Strap.
.
2. Fasten Mounting Strap to Outlet box (not provided) with
Mounting Screw.
3.
Connect the wires. Splice the black, smooth, or round Fixture
Wires to the Black Supply Wire and the white, ribbed, or
flat-sided Fixture Wires to the White Supply Wire using wire
Connectors.
CAUTION: Be certain that no bare·wire strands are exposed
outside of the wire connectors.
4. Attach the Ground wire onto the Mounting Strap with Ground
Screw and tighten.
Carefully tuck all spliced wires into the Outlet box.
5. Mount Fxture Pan to ceiling allowing Machine Screws to pass
through holes
in
the Fixture Pan and secure with Small Ball Nuts.
6. lnsfall lamp (not included).
7. Put Glass Shade into Ring and secure with Clip.
8. Raise Glass Shade with Ring up to ceiling and secure
in
place
with the Large Ball Nuts.
The installation
is
now complete and power may be reconnected at
the main fuse box.
Remove all parts and parts packages from carton.
IMPORTANT! TO PREVENT ELECTRICAL SHOCK,
TURN OFF ELECTRICITY
AT
CIRCUIT BREAKER
OR FUSE BOX BEFORE PROCEEDINGtWITH INSTALLATION.
ASSEMBLY
&
INSTRUCTIONS