
Installation & Assembly


9
9. ATTACHING THE LIGHT
KIT
(Optional)
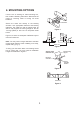
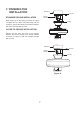
1. Remove the switch housing cover from the
switch housing. Remove the plug from the
switch housing cover, attach the light kit to the
switch housing cover by feeding the light kit
wires (black and white) through the hole of
switch housing cover and then screw it onto the
switch housing cover by nut & lock washer
provided. Be sure it is tight enough to prevent
light kit from vibrating loose. (Fig. 16)
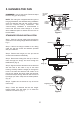
2. While holding the light kit under your fan, locate
two single white and blue wires in the switch
housing labeled "FOR LIGHT". Make the
polarized plug connections: (Fig. 17)
- White to white
- Blue to black
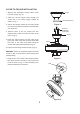
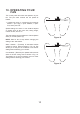
3. Carefully push all wires back into the switch
housing. Attach the light kit fitter by aligning its
keyhole slots with the three screw holes and the
reverse switch on the side of the switch
housing. Tighten the three screws securely to
prevent the light kit from vibrating loose.
4. Install CFL bulbs (not included).
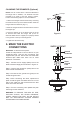
5. Remove the rubber washer, metal nut, light cap
and decorative nut from the light kit. Place glass
shade over the light kit stem, secure with the
rubber washer, metal nut, light cap and
decorative nut. Do not overtighten.
6. Restore power and your light kit is ready for
operation.
NOTE: Make sure to leave enough space between
the fan pull chain and the bulbs so the chain
doesn't rub against any of the bulbs.
Figure 16
Figure 17
Switch
housing
cover
Lock washer
Light kit
Plug
Nut
Glass shade
Bulbs
Wire nuts
Screws
Light kit
assembly
Pull chains
Metal nut
Decorative nut
Light cap
Rubber washer