
User's Manual

9 RECONYX
®
, Inc.
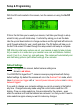
Setup & Programming
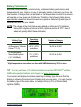
With the SD card inserted in the camera, turn the camera on using the On/Off
switch.
If this is the first time you’ve used your camera, it will take you through a setup
wizard to help you with initial setup. It will start by asking you to set the date.
Use the up and down buttons to change numbers and the right and left buttons to
scroll through settings for year, month and date. The OK button will take you to
the Set Time screen. Proceed through the setup wizard until setup is complete.
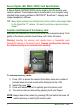
TIP: After the initial setup options are set, your camera is ready to take pictures.
All you need to do is make sure your camera has a card and batteries installed,
mount it, turn it on, close it up, and walk away. The camera will automatically arm
and start taking pictures (with default settings) in two minutes.
Default Settings
NOTE: Throughout this manual, default camera settings are
shown in red letters.
Your RECONYX
®
HyperFire 2™ camera comes pre-programmed with factory
default settings. By default the camera will run in the Quickset Trail mode, which
takes 3 pictures per trigger with a 1 second pause between pictures and no delay
between triggers.
If you wish to change your camera’s settings you can do so easily in the field at
any time. Changes are easily made using the control buttons and the LCD
display. Once you make selections, they are retained by the camera – even
when the camera is off and the batteries are removed – so that you don’t need to
make selections again unless you want to make any changes.