Command Monitoring Station 2.0 Version 1.
©2012 ReconRobotics All materials contained in this document are proprietary and confidential. Reproduction and duplication, without specific written permission, is strictly prohibited. For the most up-to-date version of this manual, please visit the ReconRobotics website. ReconRobotics, Inc 7620 W 78th Street Edina, MN 55439 Phone: 1-866-697-6267 or 952-935-5515 Fax: 952-935-5508 Website: http://www.reconrobotics.com Email: support@reconrobotics.
ReconRobotics Command Monitoring Station 2.0 Table of Contents Page Command Monitoring Station 2.0 (CMS 2.0) Inventory 3 Hardware Setup & Use 4 Channel Selection 5 CMS 2.0 Software System Requirements 6 CMS 2.0 Software Installation 7 CMS 2.0 Software Main Screen 8 CMS 2.
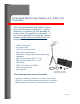
Command Monitoring Station 2.0 (CMS 2.0) Inventory The Command Monitoring Station comes with the following components. Please inspect the inventory in this package to ensure that all materials are present. If any of the materials are missing, please contact support@reconrobotics.com for assistance. CMS 2.
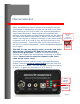
Hardware Setup & Use Follow these instructions to set up your Command Monitoring Station 2.0: Plug either power supply cord into the CMS Receiver. Plug the power supply cord into a power source – standard wall (AC) or vehicle outlet (DC), but not both at the same time. Attach the Yagi antenna to the joystick head on the tripod or use a mounting system of your choice. Attach the BNC coaxial cable to the Yagi Antenna and to the CMS Receiver.
Channel Selection Every ReconRobotics robot is preset to one specific channel. The channel is indicated by a sticker on the shell of the robot. When pairing an OCU and a robot, the channel designations must match identically. Robot systems are specified with different channel letters so that multiple robots can be used in the same area without interference. When using two robots, make sure they are on different channels. If two robots share a channel, such as A.
CMS 2.0 Software System Requirements Minimum System Requirements USB 2.0 equipped desktop or laptop CPU: 1 GHz RAM: 512 MB OS: Microsoft® Windows® XP w/ Service Pack 3 or above Hard Drive Disk Space: 20MB Recommended System Requirements USB 2.0 equipped desktop or laptop CPU: 2.
CMS 2.0 Software Installation To install the CMS 2.0 Software: Please close all running programs before beginning. Insert the CMS 2.0 Software CD-ROM into your CD-ROM Drive. The installation program will automatically start. Follow the steps in the installation program. The installation may require a reboot of your computer. After restarting, you should be able to run the CMS 2.0 software from a shortcut on your desktop.
CMS 2.0 Software Main Screen CONTROL BAR: Located at the bottom of the CMS 2.0 Software main window and contains all of the controls for the following functions. RECORD VIDEO: Start recording. Once pressed, the status bar at the top of the window will indicate that the software is recording and will note the elapsed time. This icon will also change to a blue square “Stop” button. Press this button to stop recording and save the video. Videos will be saved as .wmv files.
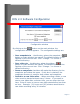
CMS 2.0 Software Configuration Configuration window By clicking on the button on the main window, the configuration window appears. The configurable settings are: Save snapshots to – the directory where the snapshots ( button on main window) are saved. The default location is the Desktop of the current user. Click “Change…” to choose a different directory. Save videos to – the directory where the videos ( button on main window) are saved. The default location is the Desktop of the current user.
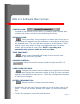
FAQs / Troubleshooting Why can’t my computer detect the Command Monitoring Station? Make sure that the CMS Receiver is connected to a USB 2.0 port. Make sure that your system has updated USB host drivers. Make sure the CMS Receiver power is on. Why isn’t the application displaying video from the robot? First, make sure that your robot is active and transmitting video. Check that: The robot has been activated (pin out). The OCU screen is displaying video from the robot.
Can I drive the robot from the CMS 2.0? No, the CMS 2.0 is designed for receiving video and audio only. How do I request service if my CMS 2.0 is still experiencing problems? If you’re experiencing problems with your CMS 2.0 that haven’t been covered by any of the questions in the FAQs, you can request service or repairs by contacting your ReconRobotics sales representative. Our technical staff will attempt to troubleshoot the problem over the phone.
Warranty Warranty The manufacturer’s warranty documentation is available online at http://www.reconrobotics.com/warranty. ReconRobotics, Inc 7620 W 78th Street Edina, MN 55439 Phone: 1-866-697-6267 or 952-935-5515 Fax: 952-935-5508 Website: http://www.reconrobotics.com For customer service, call 866-398-1921 Or email support@reconrobotics.