
User's Guide
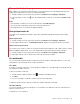

Table Of Contents
- Discover your Chromebook
- Chapter 1. Meet your Chromebook
- Chapter 2. Explore your Chromebook
- Chapter 3. CRU replacement
- Chapter 4. Help and support
- Appendix A. Accessibility and ergonomic information
- Appendix B. Compliance information
- Appendix C. Notices and trademarks

device and security feature. Lenovo is not responsible for the locking device and security feature. You can
purchase the cable locks at
https://smartfind.lenovo.com.
Navigate your user interface
1. Search box and the app
Launcher
• Type the name of your device, app, or Web page in the search box.
• Click any app shown in the app Launcher to open the app quickly.
2. Launcher button
Open the search box and the app Launcher.
3. Shelf
Pin your frequently used apps or Web pages to the shelf for easy access.
4. Stylus (for selected models of
Lenovo 300e/500e Chromebook
Gen 3)
Use the electronic pen to increase productivity.
5. System tray
Manage network connections, updates, and settings. By default, network
connection status, battery status, and the time are displayed.
Connect to Wi-Fi networks
1. Click the network icon in the system tray. A list of available wireless networks is displayed.
2. Select a network available for connection. Provide required information, if needed.
Set up a Bluetooth connection
You can connect all types of Bluetooth-enabled devices to your Chromebook, such as a keyboard, a mouse,
a smartphone, or speakers. To ensure successful connection, place the devices at most 10 meters (33 feet)
from your Chromebook.
1. Click the Bluetooth icon in the system tray. A list of available Bluetooth devices is displayed.
2. Select a Bluetooth device, and then follow the on-screen instructions.
8
Lenovo 100e/300e/500e Chromebook Gen 3 User Guide