00w Gen 3, 300w Gen 3, and 500w Gen 3 User Guide
Read this first Before using this documentation and the product it supports, ensure that you read and understand the following: • Safety and Warranty Guide • Setup Guide • Generic Safety and Compliance Notices First Edition (February 2021) © Copyright Lenovo 2021. LIMITED AND RESTRICTED RIGHTS NOTICE: If data or software is delivered pursuant to a General Services Administration “GSA” contract, use, reproduction, or disclosure is subject to restrictions set forth in Contract No. GS35F-05925.
&RQWHQWV Discover your Lenovo notebook. . . . . iii Chapter 1. Meet your computer . . . . . 1 Front . . . . . . . . Base . . . . . . . . Left . . . . . . . . Right . . . . . . . . Bottom . . . . . . . Rear . . . . . . . . Specifications . . . . USB specifications . . . . . . . . . . . . . . . . . . . . . . . . . . . . . . . . . . . . . . . . . . . . . . . . . . . . . . . . . . . . . . . . . . . . . . . . . . . . . . . . . . . . . . . . . . . . . . . . . 1 2 3 4 5 6 6 6 Chapter 2.
ii 100w Gen 3, 300w Gen 3, and 500w Gen 3 User Guide
Discover your Lenovo notebook Thank you for choosing a Lenovo notebook! We are dedicated to delivering the best solution to you. Before starting your tour, please read the following information: • Illustrations in this documentation might look different from your product. • Depending on the model, some optional accessories, features, software programs, and user interface instructions might not be applicable to your computer. • Documentation content is subject to change without notice.
iv 100w Gen 3, 300w Gen 3, and 500w Gen 3 User Guide
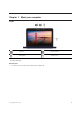
Chapter 1.
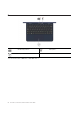
Base World-facing camera * Trackpad * for selected models of 300w Gen 3 and 500w Gen 3 2 100w Gen 3, 300w Gen 3, and 500w Gen 3 User Guide Microphone *
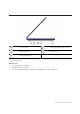
Left Power connector / USB-C® 3.2 connector Gen 1 Always On USB 3.2 connector Gen 1 HDMIറ connector Audio connector Lenovo Integrated Pen * * for selected models Related topics • “Charge the battery” on page 16 • “USB specifications” on page 6 • “Use Lenovo Integrated Pen (for 300w Gen 3 and 500w Gen 3 only)” on page 14 Chapter 1.
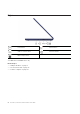
Right Power button Volume button * USB 3.
Bottom Keyboard drainage hole Speakers Keyboard drainage hole Drain out liquid from your computer if you accidentally spill liquid on the keyboard. Chapter 1.
Rear Nano-SIM-card tray (for 300w Gen 3 only) Related topics • “Connect to a cellular network (for 300w Gen 3 only)” on page 9 Specifications For detailed specifications of your computer, go to https://psref.lenovo.com. USB specifications Note: Depending on the model, some USB connectors might not be available on your computer. Connector name Description Connect USB-compatible devices, such as a USB keyboard, USB mouse, USB storage device, or USB printer. • USB 2.0 connector • USB 3.
Statement on USB transfer rate Depending on many factors such as the processing capability of the host and peripheral devices, file attributes, and other factors related to system configuration and operating environments, the actual transfer rate using the various USB connectors on this device will vary and will be slower than the data rate listed below for each corresponding device. USB device Data rate (Gbit/s) 3.2 Gen 1 / 3.1 Gen 1 5 3.2 Gen 2 / 3.1 Gen 2 10 3.
8 100w Gen 3, 300w Gen 3, and 500w Gen 3 User Guide
Chapter 2. Get started with your computer Access networks This section helps you connect to a wireless or wired network. Connect to Wi-Fi networks Click the network icon in the Windows® notification area, and then select a network for connection. Provide required information, if needed. Connect to a cellular network (for 300w Gen 3 only) If your computer has a wireless wide area network (WAN) card and a nano-SIM card installed, you can connect to a cellular data network and get online everywhere.
4. Click the network icon, and then select the cellular network icon information, if needed. from the list. Provide required Turn on the Airplane mode When the Airplane mode is enabled, all wireless features are disabled. 1. Click the action center icon in the Windows notification area. 2. Click Airplane mode to turn on the Airplane mode. Interact with your computer Your computer provides you various ways to navigate the screen. Use Hotkeys Some keys on the keyboard are printed with icons.
Note: Some gestures might not be available depending on the app you use. Tap once to single click Tap twice quickly to double-click Tap and hold to right-click Slide to scroll through items Zoom out Zoom in Swipe from the right: open action center Swipe from the left: view all open windows Drag Swipe downwards shortly: show title bar Swipe downwards: close the current app Chapter 2.
Maintenance tips: • Turn off the computer before cleaning the multi-touch screen. • Use a dry, soft, and lint-free cloth or a piece of absorbent cotton to remove fingerprints or dust from the multi-touch screen. Do not apply solvents to the cloth. • The multi-touch screen is a glass panel covered with a plastic film. Do not apply pressure or place any metallic object on the screen, which might damage the touch panel or cause it to malfunction.
Set the display mode Press F10 or Fn + F10 and then select a display mode of your preference. Change display settings 1. Right-click a blank area on the desktop and select Display settings. 2. Select the display that you want to configure. 3. Change display settings of your preference. You can change the settings for both the computer display and the external display. For example, you can define which one is the main display and which one is the secondary display.
Use Lenovo Integrated Pen (for 300w Gen 3 and 500w Gen 3 only) The garaged rechargeable electronic Lenovo Integrated Pen enables a more precise and easier way of writing and sketching. Eraser button Right-click button Notes: • Lenovo Integrated Pen is not waterproof. Keep the pen away from water and excessive moisture. • To purchase Lenovo Integrated Pen, go to https://www.lenovo.com/accessories. • Select models support Pencil with a conductive tip. The tip diameter should be more than 2 mm.
Chapter 3. Explore your computer Lock the computer Lock your computer to a desk, table, or other fixtures through a compatible security cable lock. Note: The slot supports cable locks that conform to the Kensington MiniSaver® lock standards using Cleatറ locking technology. You are responsible for evaluating, selecting, and implementing the locking device and security feature. Lenovo is not responsible for the locking device and security feature. You can purchase the cable locks at https://smartfind.lenovo.
• The Vantage app makes periodic updates of the features to keep improving your experience with your computer. The description of features might be different from that on your actual user interface. Manage power Use the information in this section to achieve the best balance between performance and power efficiency. Check the battery status and temperature Check the battery status or is in the Windows notification area.
2. Change the settings as you prefer. Transfer data Quickly share your files using the built-in Bluetooth or NFC technology among devices with the same features. You also can insert a media card or smart card to transfer data. Connect to a Bluetooth-enabled device You can connect all types of Bluetooth-enabled devices to your computer, such as a keyboard, a mouse, a smartphone, or speakers. To ensure successful connection, place the devices at most 10 meters (33 feet) from the computer. 1.
18 100w Gen 3, 300w Gen 3, and 500w Gen 3 User Guide
Chapter 4. Configure advanced settings This chapter provides information about the UEFI (Unified Extensible Firmware Interface) BIOS (Basic Input/ Output System) setup utility and system recovery information. UEFI BIOS setup utility UEFI BIOS setup utility is the first program that the computer runs. When the computer turns on, UEFI BIOS setup utility performs a self test to make sure that various devices in the computer are functioning. Enter the UEFI BIOS setup utility Restart the computer.
Notes: • All passwords set in the setup utility consist of alphanumeric characters only. • If you start the setup utility using the user password, you can only change a few settings. Password type Pre-requisite Usage Administrator password No Use the administrator password to enter the setup utility. User password The administrator password must be set. Use the user password to enter the setup utility.
1. Enter the setup utility. 2. Select Security ᇆ Set User Password and press Enter. 3. Enter a password string that contains only letters and numbers and then press Enter. Note: The user password should be different from the administrator password. 4. Enter the password again and press Enter. 5. Select Exit ᇆ Exit Saving Changes. Change or remove the user password 1. Enter the setup utility. 2. Select Security ᇆ Set User Password and press Enter. 3. Enter the current password. 4.
If the hard disk password is set, you must enter the password to enter the setup utility or the operating system. Change or remove the hard disk password 1. Enter the setup utility. 2. Select Security. 3. To change or remove the hard disk password, do one of the following: • To change or remove the master hard disk password, select Change Master Password and press Enter. Notes: – If you remove the master hard disk password, the user hard disk password is also removed.
Windows automatic recovery Note: Ensure that your computer is connected to ac power during the recovery process. The Windows recovery environment on your computer operates independently from the Windows 10 operating system. It enables you to recover or repair the operating system even if the Windows 10 operating system fails to start. After two consecutive failed boot attempts, the Windows recovery environment starts automatically.
24 100w Gen 3, 300w Gen 3, and 500w Gen 3 User Guide
Chapter 5. Help and support Frequently asked questions How do I open the Control Panel? • Open the Start menu and select Windows System ᇆ Control Panel. • Use Windows Search. How should I turn off my computer? Open the Start menu and select Power ᇆ Shut down. How do I partition my storage drive? Refer to https://support.lenovo.com/solutions/ht503851. What should I do if my computer stops responding. Press and hold the power button until the computer turns off. Then restart the computer. 1.
Self-help resources Use the following self-help resources to learn more about the computer and troubleshoot problems. Resources How to access? Use the Vantage app to: • Configure device settings. • Download and install UEFI BIOS, drivers, and firmware updates. • Secure your computer from outside threats. Type 9DQWDJH in the search box. • Diagnose hardware problems. • Check the computer warranty status. • Access User Guide and helpful articles.
The absence of a Genuine Microsoft label does not indicate that the preinstalled Windows version is not genuine. For details on how to tell whether your preinstalled Windows product is genuine, refer to the information provided by Microsoft at https://www.microsoft.com/en-us/howtotell/default.aspx. There are no external, visual indicators of the Product ID or Windows version for which the computer is licensed. Instead, the Product ID is recorded in the computer firmware.
• Which software applications were running at the time of the problem? • Can the problem be reproduced? If so, how? 2. Record the system information: • Product name • Machine type and serial number The following illustration shows where to find the machine type and serial number of your computer. Lenovo Customer Support Center During the warranty period, you can call Lenovo Customer Support Center for help.
• Installation and maintenance of network operating systems (NOS) • Installation and maintenance of programs For the terms and conditions of the Lenovo Limited Warranty that apply to your Lenovo hardware product, go to: • https://www.lenovo.com/warranty/llw_02 • https://pcsupport.lenovo.com/warrantylookup Chapter 5.
30 100w Gen 3, 300w Gen 3, and 500w Gen 3 User Guide
Appendix A. Accessibility and ergonomic information This chapter provides information about accessibility and ergonomics. Accessibility information Lenovo is committed to providing users who have hearing, vision, and mobility limitations with greater access to information and technology. This section provides information about the ways these users can get the most out of their computer experience. You also can get the most up-to-date accessibility information from the following Web site: https://www.
keyboard with all the standard keys. You can select keys using the mouse or another pointing device, or you can tap to select the keys if your computer supports multi-touch screen. • High Contrast High Contrast is a feature that heightens the color contrast of some text and images on your screen. As a result, those items are more distinct and easier to identify. • Personalized keyboard Adjust keyboard settings to make your keyboard easier to use.
– Change the size of all the items on your screen. 1. Right-click a blank area on the desktop and then click Display settings ᇆ Display. 2. Change the item size by following the on-screen instructions. For some applications, your configuration might not take effect until you sign out and then sign in again. – Change the size of the items on a Web page. Press and hold Ctrl, and then press the plus-sign key (+) to enlarge or the minus-sign key (–) to reduce the text size.
Display: Position the display to maintain a comfortable viewing distance of 510 mm to 760 mm (20 inches to 30 inches). Avoid glare or reflections on the display from overhead lighting or outside sources of light. Keep the display screen clean and set the brightness to levels that enable you to see the screen clearly. Press the brightness control keys to adjust display brightness. Head position: Keep your head and neck in a comfortable and neutral (vertical, or upright) position.
Appendix B. Compliance information Note: For more compliance information, refer to Generic Safety and Compliance Notices and Regulatory Notice at https://pcsupport.lenovo.com. Federal Communications Commission (FCC) Supplier’s Declaration of Conformity The following information refers to Lenovo 100w Gen 3, Lenovo 300w Gen 3, and Lenovo 500w Gen 3.
Korea ꓩꟹ 놹볁 뿱겕 H△⮰⸃㠓✟@RTPP㲷RTXSNU@L@UWRU㲷UXRU@※☧ⴣ㦏㩻᠀I 뼩鲮 ꓩꟹ閵 놹볁뿱겕 閵鱚ꫦ넩 넽냱ꕵꈑ 넭ꐺ껽놹隱 隵ꇝ鷑 ꟹ걙鱉 뼕 ꯍ 꽻넁 SAR 뇊ꚩ ꚭ 녚렍鱉 놹볁 鬭띑꾅 鲵뼑 閵넩麑ꄱ넭냹 띞눦뼞鱽鲙. ꚭ 녚렍鱉 ꓩ ꭖꯍ겕韥 넺鱽鲙. ꚭ 녚렍鱉 霢뇑 閵넩麑ꄱ넭냱ꈑ 靁녚鷍鱉 놹볁 鬭띑꾅 鲵뼑 뇑뼑냹 뚽隱뼍덵 껿鵹ꈒ 陹鷍꽽걪鱽鲙. 녚렍 꼖ꫭꍡ ꗄ 뜑겕 ꜵ븽냹 ꩡ끞뼕 陲끥 SAR 闇넩 鲡ꄱ덽 ꯍ 넽 걪鱽鲙. SAR 闇냵 霢閵 ꚩ隕 ꗄ 묁걙뱭 끉霡 ꩡ뼢隱 髙뱭낁먡 鲵꾢꾅 黥ꄱ 鲙ꌱ ꯍ 넽걪鱽鲙. ꚭ 녚렍 鱉 ꩡꅁ넍 겕뙩꾅 20mm 넩ꩶ넍 阥ꍡ꾅 ꩡ끞뼕 ꯍ 넽걪鱽鲙.
Appendix C. Notices and trademarks Notices Lenovo may not offer the products, services, or features discussed in this document in all countries. Consult your local Lenovo representative for information on the products and services currently available in your area. Any reference to a Lenovo product, program, or service is not intended to state or imply that only that Lenovo product, program, or service may be used.
Any performance data contained herein was determined in a controlled environment. Therefore, the result obtained in other operating environments may vary significantly. Some measurements may have been made on development-level systems and there is no guarantee that these measurements will be the same on generally available systems. Furthermore, some measurements may have been estimated through extrapolation. Actual results may vary.