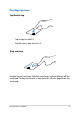
One-finger gestures Tap/Double-tap • Tap an app to select it. • Double-tap an app to launch it. Drag and drop Double-tap an item, then slide the same finger without lifting it off the touchpad. To drop the item to its new location, lift your finger from the touchpad.
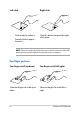
Left-click Right-click • Click an app to select it. • Double-click an app to launch it. Click this button to open the rightclick menu. NOTE: The areas inside the dotted line represent the locations of the left mouse button and the right mouse button on the touchpad. Two-finger gestures Two-finger scroll (up/down) Two-finger scroll (left/right) Slide two fingers to scroll up or down. Slide two fingers to scroll left or right.
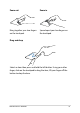
Zoom out Zoom in Bring together your two fingers on the touchpad. Spread apart your two fingers on the touchpad. Drag and drop Select an item then press and hold the left button. Using your other finger, slide on the touchpad to drag the item, lift your finger off the button to drop the item.
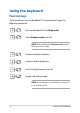
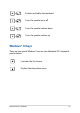
Using the keyboard Function keys The function keys on your Notebook PC’s keyboard can trigger the following commands: Puts the Notebook PC into Sleep mode Turns Airplane mode on or off NOTE: When enabled, the Airplane mode disables all wireless connectivity. Decreases display brightness Increases display brightness Turns the display panel on or off Toggles the display mode NOTE: Ensure that the second display is connected to your Notebook PC.
Enables or disables the touchpad Turns the speaker on or off Turns the speaker volume down Turns the speaker volume up Windows® 10 keys There are two special Windows® keys on your Notebook PC’s keyboard used as below: Launches the Start menu Displays the drop-down menu Notebook PC E-Manual 35
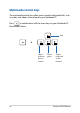
Multimedia control keys The multimedia control keys allow you to control multimedia files, such as audios and videos, when played in your Notebook PC. Press in combination with the arrow keys on your Notebook PC, illustrated as below.
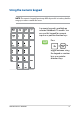
Using the numeric keypad NOTE: The numeric keypad layout may differ by model or territory but the usage procedures remain the same. A numeric keypad is available on selected Notebook PC models. You can use this keypad for numeric input or as pointer direction keys. Press to toggle between using the keypad as number keys or as pointer direction keys.
Using the touch screen panel as a tablet To use your Notebook PC’s touch screen panel as a tablet device, you may adjust it all the way into a 360° angle as shown below.
Chapter 3: Working with Windows® 10 Notebook PC E-Manual 39
Starting for the first time When you start your Notebook PC for the first time, a series of screens appear to guide you in configuring your Windows® 10 operating system. To start your Notebook PC for the first time: 1. Press the power button on your Notebook PC. Wait for a few minutes until the setup screen appears. 2. From the setup screen, pick your region and a language to use on your Notebook PC. 3. Carefully read the License Terms. Select I accept. 4.
Start menu The Start menu is the main gateway to your Notebook PC’s programs, Windows® apps, folders, and settings.
Launching the Start menu Tap the Start button in the lower-left corner of your desktop. Position your mouse pointer over the Start button in the lower-left corner of your desktop then click it. Press the Windows logo key on your keyboard. Opening programs from the Start menu One of the most common uses of the Start menu is opening programs installed on your Notebook PC. Tap the program to launch it. Position your mouse pointer over the program then click to launch it.
Windows® apps These are apps pinned on the right pane of the Start menu and displayed in tiled-format for easy access. NOTE: Some Windows® apps require signing in to your Microsoft account before they are fully launched.
Working with Windows® apps Use your Notebook PC’s touch screen, touchpad, or keyboard to launch, customize, and close apps. Launching Windows® apps from the Start menu Tap the app to launch it. Position your mouse pointer over the app then click to launch it. Use the arrow keys to browse through the apps. Press to launch an app.
Resizing apps Press and hold the app, then tap and select an app tile size. Position your mouse pointer over the app and right-click it, then click Resize and select an app tile size. Use the arrow keys to navigate to the app. Press , then select Resize and select an app tile size. Unpinning apps Press and hold the app, then tap the icon. Position your mouse pointer over the app and right-click it, then click Unpin from Start. Use the arrow keys to navigate to the app.
Pinning apps to the taskbar Press and hold the app, then tap Pin to taskbar. Position your mouse pointer over the app and right-click it, then click Pin to taskbar. Use the arrow keys to navigate to the app. Press , then select Pin to taskbar. Pinning more apps to the Start menu From All apps, press and hold the app you want to add to the Start menu, then tap Pin to Start.
Task view Quickly switch between opened apps and programs using the task view feature, you can also use task view to switch between desktops. Launching task view Tap the icon on the taskbar or swipe form the left edge of the screen. Position your mouse pointer over the icon on the taskbar and click it. Press Notebook PC E-Manual on your keyboard.
Snap feature The Snap feature displays apps side-by-side, allowing you to work or switch between apps. Snap hotspots You can drag and drop apps to these hotspots to snap them into place.
Using Snap or 1. Launch the app you wish to snap. 2. Drag the title bar of your app and drop the app to the edge of the screen to snap. 3. Launch another app and repeat the above steps to snap another app. 1. Launch the app you wish to snap. 2. Press and hold the key, then use the arrow keys to snap the app. 3. Notebook PC E-Manual Launch another app and repeat the above steps to snap another app.
Action Center Action Center consolidates notifications from apps and presents a single place where you can interact with them. It also has a really useful Quick Actions section at the bottom. Launching Action Center Click the icon on the taskbar or swipe from the right edge of the screen. Position your mouse pointer over the icon on the taskbar and click it. Press 50 on your keyboard.
Other keyboard shortcuts Using the keyboard, you can also use the following shortcuts to help you launch applications and navigate Windows® 10. \ Launches Start menu Launches Action Center Launches the desktop Launches the File Explorer Opens the Share panel Launches Settings Launches Connect panel Activates the Lock screen Minimizes all currently active windows Notebook PC E-Manual 51
Launches Search Launches Project panel Opens the Run window Opens Ease of Access Center Opens the context menu of the Start button Launches the magnifier icon and zooms in your screen Zooms out your screen Opens Narrator Settings 52 Notebook PC E-Manual
Connecting to wireless networks Wi-Fi Access emails, surf the Internet, and share applications via social networking sites using your Notebook PC’s Wi-Fi connection. IMPORTANT! Airplane mode disables this feature. Ensure that Airplane mode is turned off before enabling the Wi-Fi connection of your Notebook PC. Connecting Wi-Fi Connect your Notebook PC to a Wi-Fi network by using the following steps: or 1. Select the icon from the taskbar. 2. Select the icon to enable Wi-Fi. 3.
Bluetooth Use Bluetooth to facilitate wireless data transfers with other Bluetoothenabled devices. IMPORTANT! Airplane mode disables this feature. Ensure that Airplane mode is turned off before enabling the Bluetooth connection of your Notebook PC. Pairing with other Bluetooth-enabled devices You need to pair your Notebook PC with other Bluetooth-enabled devices to enable data transfers. Connect your devices by using the following steps: or 1. Launch Settings from the Start menu. 2.
Airplane mode Airplane mode disables wireless communication, allowing you to use your Notebook PC safely while in-flight. NOTE: Contact your airline provider to learn about related in-flight services that can be used and restrictions that must be followed when using your Notebook PC in-flight. Turning Airplane mode on 1. Launch Action Center from the taskbar. 2. Select the icon to enable Airplane mode. or . Press Turning Airplane mode off 1. Launch Action Center from the taskbar. 2.
Connecting to wired networks You can also connect to wired networks, such as local area networks and broadband Internet connection, using your Notebook PC’s LAN port. NOTE: Contact your Internet Service Provider (ISP) for details or your network administrator for assistance in setting up your Internet connection. To configure your settings, refer to the following procedures.
7. Return to the Network and Sharing Center window then select Set up a new connection or network. 8. Select Connect to the Internet then select Next. 9. Select Broadband (PPPoE). 10. Type your User name, Password, and Connection name then select Connect. 11. Select Close to finish the configuration. 12. Select on the taskbar then select the connection you just created. 13. Type your user name and password then select Connect to start connecting to the Internet.
Turning your Notebook PC off You can turn off your Notebook PC by doing either of the following procedures: or • Launch the Start menu, then select Shut down to do a normal shutdown. • From the log-in screen, select • Press > > Shut down. to launch Shut Down Windows. Select Shut down from the drop-down list then select OK. • 58 If your Notebook PC is unresponsive, press and hold the power button for at least four (4) seconds until your Notebook PC turns off.
Putting your Notebook PC to sleep To put your Notebook PC to Sleep mode: or • Launch the Start menu, then select Sleep to put your Notebook PC to sleep. • From the log-in screen, select Press > > Sleep. to launch Shut Down Windows. Select Sleep from the drop-down list then select OK. NOTE: You can also put your Notebook PC to Sleep mode by pressing the power button once.
60 Notebook PC E-Manual
Chapter 4: Power-On Self-Test (POST) Notebook PC E-Manual 61
The Power-On Self-Test (POST) The POST (Power-On-Self-Test) is a series of software-controlled diagnostic tests that run when you turn on or restart your Notebook PC. The software that controls the POST is installed as a permanent part of the Notebook PC’s architecture. Using POST to access BIOS and Troubleshoot During POST, you can access the BIOS settings or run troubleshooting options using the function keys of your Notebook PC. You may refer to the following information for more details.
BIOS Settings NOTE: The BIOS screens in this section are for reference only. The actual screens may differ by model and territory. Boot This menu allows you to set your boot option priorities. You may refer to the following procedures when setting your boot priority. On the Boot screen, select Boot Option #1. 1. Main Aptio Setup Utility - Copyright (C) 2015 American Megatrends, Inc.
2. Press Main and select a device as the Boot Option #1. Aptio Setup Utility - Copyright (C) 2015 American Megatrends, Inc.
Security This menu allows you to set up the administrator and user password of your Notebook PC. It also allows you to control the access to your Notebook PC’s hard disk drive, input/output (I/O) interface, and USB interface. NOTE: Main • If you install a User Password, you will be prompted to input this before entering your Notebook PC's operating system. • If you install an Administrator Password, you will be prompted to input this before entering BIOS.
To set the password: 1. On the Security screen, select Administrator Password or User Password. 2. Type in a password then press 3. Re-type to confirm the password then press . . To clear the password: 1. On the Security screen, select Administrator Password or User Password. 2. Type in the current password then press 3. Leave the Create New Password field blank then press 4. Select Yes in the confirmation box then press 66 . . .
I/O Interface Security In the Security menu, you can access I/O Interface Security to lock or unlock some interface functions of your Notebook PC. Aptio Setup Utility - Copyright (C) 2015 American Megatrends, Inc. Security I/O Interface Security LAN Network Interface [UnLock] Wireless Network Interface [UnLock] HD AUDIO Interface [UnLock] If Locked, LAN controller will be disabled.
USB Interface Security Through the I/O Interface Security menu, you can also access USB Interface Security to lock or unlock ports and devices. Aptio Setup Utility - Copyright (C) 2015 American Megatrends, Inc. Security USB Interface Security USB Interface [UnLock] External Ports [UnLock] CMOS Camera [UnLock] Card Reader Lock [UnLock] USB Interface UnLock If Locked, all USB device will be disabled →← : Select Screen : Select Item ↑↓ Enter: Select +/— : Change Opt.
Set Master Password In the Security menu, you can use Set Master Password to set up a password-enabled access to your hard disk drive. Aptio Setup Utility - Copyright (C) 2015 American Megatrends, Inc. Main Setup Advanced Security(C) Save Exit Aptio UtilityBoot - Copyright 2011 &American Megatrends, Inc. Password Description Set HDD Master Password. If ONLY the Administrator’s password is set,then this only limits access to Setup and is only asked for when entering Setup.
Save & Exit To keep your configuration settings, select Save Changes and Exit before exiting the BIOS. Main Aptio Setup Utility - Copyright (C) 2015 American Megatrends, Inc. Advanced Boot Security Save & Exit Save Changes and Exit Discard Changes and Exit Exit system setup after saving the changes.
To update the BIOS: 1. Verify the Notebook PC’s exact model then download the latest BIOS file for your model from the ASUS website. 2. Save a copy of the downloaded BIOS file to a flash disk drive. 3. Connect your flash disk drive to your Notebook PC. 4. Restart your Notebook PC then press 5. From the BIOS menu, Select Advanced > Start Easy Flash, then press during POST. . Aptio Setup Utility - Copyright (C) 2012 American Megatrends, Inc.
6. Locate your downloaded BIOS file in the flash disk drive then . press ASUSTek Easy Flash Utility FLASH TYPE: Generic Flash Type New BIOS Current BIOS Platform: TP501 Platform: Unknown Version: 101 Version: Unknown Build Date: Jan 26 2015 Build Date: Unknown Build Time: 11:51:05 Build Time: Unknown FSO FS1 0 EFI
FS2 FS3 FS4 [←→]: Switch [↑↓]: Choose [q]: Exit [Enter]: Enter/Execute 7.Recovering your system Using recovery options on your Notebook PC allows you to restore the system to its original state or simply refresh its settings to help improve performance. IMPORTANT! • Backup all your data files before doing any recovery option on your Notebook PC. • Note down important customized settings such as network settings, user names, and passwords to avoid data loss. • Ensure that your Notebook PC is plugged in to a power source before resetting your system.
• Go back to an earlier build - This option allows you to go back to an earlier build. Use this option if this build is not working for you. • Advanced startup - Using this option allows you to perform other advanced recovery options on your Notebook PC such as: - Using a USB drive, network connection or Windows recovery DVD to startup your Notebook PC.
2. Under the Update and security option, select Recovery then select the recovery option you would like to perform.
76 Notebook PC E-Manual
Tips and FAQs Notebook PC E-Manual 77
Useful tips for your Notebook PC To help you maximize the use of your Notebook PC, maintain its system performance, and ensure all your data are kept secured, here are some useful tips that you can follow: • Update Windows® periodically to ensure that your applications have the latest security settings. • Use an anti-virus software to protect your data and keep this updated too. • Unless absolutely necessary, refrain from using force shutdown to turn off your Notebook PC.
Hardware FAQs 1. A black dot, or sometimes a colored dot, appears onscreen when I turn on the Notebook PC. What should I do? Although these dots normally appear onscreen, they will not affect your system. If the incident continues and subsequently affects system performance, consult an authorized ASUS service center. 2. My display panel has an uneven color and brightness.
4. 5. My battery charge indicator does not light up. What’s wrong? • Check whether the power adapter or battery pack is attached correctly. You may also disconnect the power adapter or battery pack, wait for a minute, then reconnect them again to the power outlet and Notebook PC. • If the problem still exists, contact your local ASUS service center for assistance. Why is my touchpad not working? to enable your touchpad. Press 6.
8. My Notebook PC cannot do keystrokes correctly because my cursor keeps on moving. What should I do? Make sure that nothing accidentally touches or presses on your touchpad while you type on the keyboard. You can also disable your touchpad by pressing 9. . Instead of showing letters, pressing the “U”, “I”, and “O” keys on my keyboard displays numbers. How can I change this? Press the key or (on selected models) on your Notebook PC to turn off this feature and use the said keys for inputting letters.
Software FAQs 1. When I turn on my Notebook PC, the power indicator lights up but nothing appears on my screen. What can I do to fix this? You can try doing any of the following suggestions: 2. • Force shutdown your Notebook PC by pressing the power button for at least four (4) seconds. Check if the power adapter and battery pack are inserted correctly then turn on your Notebook PC. • If the problem still exists, contact your local ASUS service center for assistance.
4. My Notebook PC does not boot up. How can I fix this? You can try doing any of the following suggestions: 5. • Remove all connected devices to your Notebook PC then restart your system. • If the problem still exists, contact your local ASUS service center for assistance. Why can’t my Notebook PC wake up from sleep mode? • You need to press the power button to resume your last working state. • Your system might have completely used up its battery power.
84 Notebook PC E-Manual
Appendices Notebook PC E-Manual 85
Blu-ray ROM Drive Information The Blu-ray ROM Drive allows you to view high definition (HD) videos and other disc file formats such as DVDs and CDs. NOTE: The Blue-ray ROM Drive is available on selected models. Region Definitions Region A North, Central and South American countries, and their territories; Taiwan, Hong Kong, Macao, Japan, Korea (South and North), South East Asian countries and their territories.
Overview On 4th August 1998 the European Council Decision regarding the CTR 21 has been published in the Official Journal of the EC. The CTR 21 applies to all non voice terminal equipment with DTMF-dialling which is intended to be connected to the analogue PSTN (Public Switched Telephone Network).
This table shows the countries currently under the CTR21 standard.
This information was copied from CETECOM and is supplied without liability. For updates to this table, you may visit http://www.cetecom.de/technologies/ctr_21. html 1 National requirements will apply only if the equipment may use pulse dialling (manufacturers may state in the user guide that the equipment is only intended to support DTMF signalling, which would make any additional testing superfluous). In The Netherlands additional testing is required for series connection and caller ID facilities.
• Connect the equipment into an outlet on a circuit different from that to which the receiver is connected. • Consult the dealer or an experienced radio/TV technician for help. WARNING! The use of a shielded-type power cord is required in order to meet FCC emission limits and to prevent interference to the nearby radio and television reception. It is essential that only the supplied power cord be used. Use only shielded cables to connect I/O devices to this equipment.
RF Exposure Information (SAR) This device meets the government’s requirements for exposure to radio waves. This device is designed and manufactured not to exceed the emission limits for exposure to radio frequency (RF) energy set by the Federal Communications Commission of the U.S. Government. The exposure standard employs a unit of measurement known as the Specific Absorption Rate, or SAR. The SAR limit set by the FCC is 1.6 W/kg.
CE Mark Warning This device complies with the R&TTE Directive (1999/5/EC), the EMC Directive (2004/108/EC), and the Low Voltage Directive (2006/95/EC) issued by the Commission of the European Community.
IC Radiation Exposure Statement for Canada This equipment complies with IC radiation exposure limits set forth for an uncontrolled environment. To maintain compliance with IC RF exposure compliance requirements, please avoid direct contact to the transmitting antenna during transmitting. End users must follow the specific operating instructions for satisfying RF exposure compliance.
Déclaration d’Industrie Canada relative à l’exposition aux ondes radio Cet appareil est conforme aux limites d’exposition aux radiations d’Industrie Canada définies pour un environnement non-contrôlé. Pour maintenir la conformité avec les exigences d’exposition RF d’IC, veuillez éviter tout contact direct avec l’antenne pendant l’émission. Les utilisateurs finaux doivent suivre les instructions de fonctionnement spécifiques pour satisfaire la conformité aux expositions RF.
Radio Frequency (RF) Exposure Information The radiated output power of the Wireless Device is below the Industry Canada (IC) radio frequency exposure limits. The Wireless Device should be used in such a manner such that the potential for human contact during normal operation is minimized. This device has been evaluated for and shown compliant with the IC Specific Absorption Rate (“SAR”) limits when operated in portable exposure conditions.
Wireless Operation Channel for Different Domains N. America 2.412-2.462 GHz Ch01 through CH11 Japan 2.412-2.484 GHz Ch01 through Ch14 Europe ETSI 2.412-2.472 GHz Ch01 through Ch13 France Restricted Wireless Frequency Bands Some areas of France have a restricted frequency band. The worst case maximum authorized power indoors are: • 10mW for the entire 2.4 GHz band (2400 MHz–2483.5 MHz) • 100mW for frequencies between 2446.5 MHz and 2483.
Departments in which the use of the 2400–2483.
UL Safety Notices Required for UL 1459 covering telecommunications (telephone) equipment intended to be electrically connected to a telecommunication network that has an operating voltage to ground that does not exceed 200V peak, 300V peak-to-peak, and 105V rms, and installed or used in accordance with the National Electrical Code (NFPA 70).
Power Safety Requirement Products with electrical current ratings up to 6A and weighing more than 3Kg must use approved power cords greater than or equal to: H05VV-F, 3G, 0.75mm2 or H05VV-F, 2G, 0.75mm2. TV Notices Note to CATV System Installer—Cable distribution system should be grounded (earthed) in accordance with ANSI/NFPA 70, the National Electrical Code (NEC), in particular Section 820.
Nordic Lithium Cautions (for lithium-ion batteries) CAUTION! Danger of explosion if battery is incorrectly replaced. Replace only with the same or equivalent type recommended by the manufacturer. Dispose of used batteries according to the manufacturer’s instructions. (English) ATTENZIONE! Rischio di esplosione della batteria se sostituita in modo errato. Sostituire la batteria con un una di tipo uguale o equivalente consigliata dalla fabbrica. Non disperdere le batterie nell’ambiente.
Optical Drive Safety Information Laser Safety Information CD-ROM Drive Safety Warning CLASS 1 LASER PRODUCT WARNING! To prevent exposure to the optical drive’s laser, do not attempt to disassemble or repair the optical drive by yourself. For your safety, contact a professional technician for assistance. Service warning label WARNING! INVISIBLE LASER RADIATION WHEN OPEN. DO NOT STARE INTO BEAM OR VIEW DIRECTLY WITH OPTICAL INSTRUMENTS.
CTR 21 Approval (for Notebook PC with built-in Modem) Danish Dutch English Finnish French 102 Notebook PC E-Manual
German Greek Italian Portuguese Spanish Swedish Notebook PC E-Manual 103
ENERGY STAR complied product ENERGY STAR is a joint program of the U.S. Environmental Protection Agency and the U.S. Department of Energy helping us all save money and protect the environment through energy efficient products and practices. All ASUS products with the ENERGY STAR logo comply with the ENERGY STAR standard, and the power management feature is enabled by default. The monitor and computer are automatically set to sleep after 10 and 30 minutes of user inactivity.
Global Environmental Regulation Compliance and Declaration ASUS follows the green design concept to design and manufacture our products, and makes sure that each stage of the product life cycle of ASUS product is in line with global environmental regulations. In addition, ASUS disclose the relevant information based on regulation requirements. Please refer to http://csr.asus.com/english/Compliance.
Regional notice for Singapore Complies with IDA Standards DB103778 This ASUS product complies with IDA Standards. Regional notice for India This product complies with the “India E-waste (Management and Handling)Rule 2011” and prohibits use of lead, mercury, hexavalent chromium, polybrominated biphenyls (PBBs) and polybrominated diphenyl ethers (PBDEs) in concentrations exceeding 0.1 % by weight in homogenous materials and 0.
EC Declaration of Conformity We, the undersigned, Manufacturer: ASUSTeK COMPUTER INC. Address: 4F, No. 150, LI-TE Rd., PEITOU, TAIPEI 112, TAIWAN Authorized representative in Europe: ASUS COMPUTER GmbH Address, City: HARKORT STR.
108 Notebook PC E-Manual