00% MADE IN THE USA TRIPOD & MONOPOD MANUAL
WELCOME Thank you for purchasing a Really Right Stuff tripod or monopod. Many years ago, we set out to create tripods that would exemplify the best in craftsmanship and quality. We are proud to present to you the results of that pursuit. Our ‘pods are the culmination of first-hand experience and abundant input from seasoned professionals.
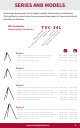
SERIES AND MODELS Our tripods & monopods vary in height, weight, load capacity, and features. ‘Pods within the same Series share a common load capacity. See our website for detailed specifications.
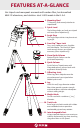
FEATURES AT-A-GLANCE Our tripods and monopods are made with carbon fiber, hard anodized 6061‑T6 aluminum, and stainless steel. 100% made in the U.S.A. 1. Mounting Stud ⁄8” Mounting Stud securely attaches to tripod heads. 3 2. Spirit Level The bullseye helps you level your tripod with ease (Versa tripods only). 3. Angle Stop The Angle Stop ratchets into place to set leg angle. 4. SureGrip™ Apex Lock Carry your tripod over your shoulder with confidence.
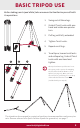
BASIC TRIPOD USE Before taking your tripod afield, take a moment to familiarize yourself with its operations. 1 2 3 4 1. Swing out all three legs. 2. Grab all Twist Locks with one hand and rotate one quarter turn. 3. Pull leg until fully extended. 4. Tighten Twist Locks. 5. Repeat on all legs. 6. To collapse, loosen twist locks and collapse leg. Grab all Twist Locks with one hand and tighten. All tripod and monopod feet are loose.
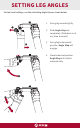
SETTING LEG ANGLES For low-level settings, use the ratcheting Angle Stop as shown below. 1. Swing leg inward slightly. 2. Slide Angle Stop out completely. (Slide back in at any time to cancel.) 3. Swing leg to horizontal position. Angle Stop will engage. 4. Move to desired position. Angle Stop will ratchet automatically.
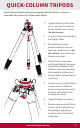
QUICK-COLUMN TRIPODS Quick-Column Tripods come with integrated Quick-Column. Column is removable for ground set; follow steps below. 1 2 1. Tighten Butterfly Knob, then use ⅛” hex key (included) to loosen Platform set screw(s) (do not remove). 2. Unscrew and remove Platform and Weight Hook. 3. Rotate Butterfly Knob counterclockwise no more than two complete turns (do not remove), then slide QuickColumn up and out. 4.
REVERSE THE STUD The threaded platform stud on the TFC-14 is dual-threaded ¼”-20 and 3⁄8”-16 and is reversible. Follow the steps to reverse the stud from 3⁄8”-16 to ¼”-20. 1. Use 5/32” hex key to unscrew and remove the Stud. 1 2. The Strap & Strap Pin must be removed before the Stud can be re-installed. Use 5/32” hex key to unscrew and remove the Strap Pin. 3. Turn the tripod upside down. Use 5/32” hex key to re-install the Stud by screwing it into the bottom of the apex. 2 4.
ADJUST THE SET SCREW The TFC-14 platform comes with one Set Screw that can be used to prevent your tripod head from coming loose. For clarity, drawings do not show the tripod head installed to the tripod. Install your tripod head, then follow steps. Set Screw 1. Swing leg closest to Set Screw inward slightly. 2 2. Pull Angle Stop out until it stops, then swing leg completely out. 1 3. Insert 2.5mm hex key into Set Screw, then turn clockwise to tighten it against the bottom of your tripod head.
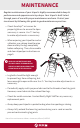
MAINTENANCE Regular maintenance of your tripod is highly recommended to keep its performance and appearance in top shape. Your tripod is built to last through years of use with proper maintenance and care. Protect your investment by following this guide to good maintenance practices. »» Check SureGrip™ set screws for proper tightness to ensure the Apex accessory is secure. Use 1⁄8” hex key to make adjustments as necessary.
CLEANING Avoiding harsh environments such as sand and saltwater is essential to preserving the life of your tripod. However, we do understand that sometimes it is unavoidable. Therefore, we have made it simple to disassemble the leg portions for thorough cleaning. 1a 1b 6 1c 2 1. Unscrew Twist Lock and fully remove leg section. 2. Remove Twist Lock, foot, and Anti-Twist Sleeves. 3. Wipe down leg, foot, and exposed threads with damp cloth, removing any dirt or debris. Allow to dry. 4.
NEW FOR 2017! Look no further for the most clever shoulder strap system for your RRS tripod*. This new system incorporates QD “Quick-Detach” mounting hardware and allows the strap to be quickly and easily removed at any time. The system has two parts: Two QD Mounts Apex QD Mount + Leg QD Mount Leg QD Mounts come in 3 sizes for RRS Series 1, 2, and 3 tubes. QD-Compatible Strap Strap must have two QD sling swivels.
QD STRAP SYSTEM Apex QD Mount For Series 2/3/4 Install Apex QD Mount to underside of apex with two screws. For TFC-14 Install Apex QD Mount into threaded socket on side of apex. 13 www.ReallyRightStuff.
CHANGING APEX ACCESSORIES Apex Accessories are only available for Versa Tripods. Your tripod head must first be removed from the Mounting Stud. 2 1. Use 1⁄8” hex key to loosen all three SureGrip™ set screws around Apex. Two rotations are sufficient, complete removal is not required. 2. Remove Apex platform or other accessory by pushing it upward. 3. Insert compatible accessory.
‘POD ACCESSORIES Tripod & Monopod Accessories to fill all your photography needs. for Versa Series 2 TA-2-QC for Versa Series 3 TA-3-QC Versa Quick Columns With integrated SureGrip™ MTX Multi-Tool The best tool for your tripod. Replacement Feet Great for tripods & monopods. TA-3-FRC Rock Claws for rocky terrain. TA-3-FS Foot Spikes for shifting terrain. Leveling Bases Choose Platform or Clamp A leveling base on your tripod is the perfect foundation for gimbal heads, pano gear, and even ballheads.
www.ReallyRightStuff.