
Installation Instructions
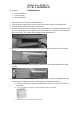


d. Unscrew the small black ring piece on the thread of the Thermo-Scanner's
mounting bracket.
e. Run the cables through the hole in the junction box.
f. Screw the black ring piece back on to the thread of the mounting bracket to
secure the scanner to the box.
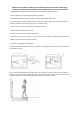
8. Ensure the bottom of the Thermo-Scanner is 5 feet from the floor.
9. Install the Thermo-Scanner mounting bracket perpendicular (90 degrees) to the floor
(not on any other angle).
10. Adjust the thermal sensor (top piece) so that the tablet portion of the device is at a
slight angle, and the thermal sensor is perpendicular with the floor (see photo below for
an example).
11. Plug the power cable into the Thermo-Scanner. Connect the other end to a power
outlet.
12. If using a wired connection, plug in an Ethernet cable from your existing internet
connection to the RJ45 port on the device.
13. Your Thermo-Scanner is now set up and ready to use. If you have any installation issues,
please call the number (860-600-0336) on the back of the unit and have your asset tag
ready. Support available M-F, 8am – 6pm EST (no holidays).
This device is not intended for use in the diagnosis of disease or other conditions or in the cure, mitigation, treatment, or
prevention of disease.
This device is not intended for a medical purpose, including
1. use by a health care professional;
2. use in a health care facility or environment; and
3. use that meets the definition of a device, (e.g., body temperature measurement for diagnostic purposes,
including such use in non-medical environments).