
Installation Guide

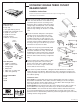
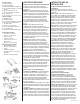

Parts Included
A. Bottom Tray
B. Top Tray
C. One pair slides (4 pieces)
D. (8)#6-32x1/4” flathead screws
E. (4) #6-32 acorn nuts
F. (4) #6-32 hex nuts
G. (2) #8 washers
H. #8x1/2” woodscrews
Tools Required
• Phillips screwdriver
• Pliers or 5/16 wrench
• Straight edge
• Utility knife
• Sabre saw or coping saw
• Table saw (optional)
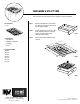
Product Assemblies
1475E
1775E
2075E
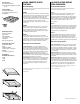
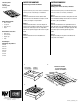
Measure interior width of drawer and subtract
1/16” from this dimension. Invert bottom tray
and mark equal cuts from each wing to the
dimension above. Cutting can be done with a
straight edge and utility knife. Care should be
taken to make parallel cuts from each wing.
Optional step: cutting can be done on a table
saw.
Locate two drawer slide pieces stamped CL
and CR. These are for bottom tray. Place
tray with op en end toward you. Place slide
members with rollers on end nearest to you.
Secure to bottom tray with 4 flathead screws
and hex nuts through pre-drilled holes nearest
the wings. Nuts go to outside of tray. Use the
2nd hole from each end of slides.
Locate front of top tray (notched end). Slide
members should be installed with flange up
and rollers toward front of tray. Secure thru
predrilled holes with four #6-32x1/4” flathead
screws and 4 acorn nuts. Place a #8 washer
between slide member and tray on right side
only.
Remove drawer from cabinet. Using a sabre
saw and eye protection, remove the top
portion of the back of the cabinet drawer so
that it is no more than 1” high on the inside,
and as wide as the lower tray.
Place lower tray inside the drawer, setting the flat end with the two small holes
against the front of the drawer. Attach the lower tray to the drawer using the two
screws provided. Place the top tier into the lower tray and replace the drawer into
the cabinet opening.
Clearance notes:
Tray Length: It is permissible for the front-to-back length of the tray to extend
beyond the lowered back of the drawer, therefore making use of the void space
between the drawer and the cabinet back. It is possible to trim the length of the
lower tray from 19-1/4” to 18-3/8” if necessary.
Drawer Height: In the event that the sides of the drawer are less than 3” high, it is
permissible for the side wings of the lower tray to sit above the drawer sides.
Drawer Width: In the event that the interior drawer width is wider than the insert,
it is recommended that the insert be installed either to the far right or left, and a
permanent front-to-back drawer partition be positioned against the open insert side,
creating another storage pocket.
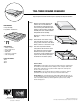
ECONOMY DOUBLE TIERED CUTLERY
DRAWER INSERT
Installation Instructions
RN-212EFS/0209
Inspect all parts and read all instructions prior to beginning
assembly and installation.
1
2700 Oak Industrial Drive NE , Grand Rapids, MI 49505 USA
800.253.1561 • www.kv.com
©2009 Knape & Vogt. All rights reserved. Knape & Vogt
®
reserves the right to change specifi cations without notice. Made in USA.
2
3
4
5
Step 1
Step 2
Step 3
Step 4
Step 5
A.
B.
C.
D.
E.
F.
G.
H.
Drawer
Members
Cabinet
Members